Crown Street, Wollongong, 2500
How to Set Up a Welcome Email Workflow in ActiveCampaign
Making a good first impression is crucial for any brand. It is one of the key factors that determine whether a prospect decides to do business with you or chooses to take their money elsewhere. In digital marketing, one of the best ways to make a great first impression on your prospective clients is through a welcome email.
What is a Welcome Email and Why is it Important?
A welcome email is the very first form of email communication that transpires between you and a contact who recently signed up to your mailing list. It’s also just the beginning of an email marketing campaign.
Unlike email promotions or newsletters that are meant to engage potential and existing customers, a welcome email is sent to your new subscribers to help them get more acquainted with your brand, serving as the foundation for future engagements.
Since it’s one of your only chances to “wow” your new subscribers, a welcome email needs to be well thought out to increase your chances of getting a reaction that benefits your brand. And by that we mean that your welcome email should be as clear and concise as possible so that your new contacts can get all of the information they need in one place, without having to put in the work. It’s all about making our prospects feel comfortable, after all.
It would also even be better if you could give your welcome email a beautiful design. Having an aesthetically pleasing welcome email is a really effective way to make a lasting impression on your new contacts.
The Easiest Way to Send Welcome Emails
Let’s say that you already have a kickass welcome email that you are ready to send to all your new contacts. But how will you deliver it to them?
Well, you have two options. Either you send your welcome email the traditional way (manually), or you can automate the email sending process.
The latter is obviously the best, easiest and most convenient way to send emails to your prospects. Not only will it allow you to send a welcome email immediately after a prospect subscribes to your mailing list, but automating your email workflow can also help you work more efficiently when it’s time to send follow-up emails.
If you do a quick Google search, you’ll find that there’s a wide range of tools out there that you can use to automate your email marketing campaigns, including the sending of welcome emails. Our marketing team has tried nearly all email marketing platforms. But out of all of them, ActiveCampaign is by far the best in terms of simplicity and functionality.
What is ActiveCampaign?
ActiveCampaign is a comprehensive customer experience platform that offers you email marketing, marketing automation, and CRM and sales automation in one place.
This platform gives you the ability to design and send beautiful email campaigns with only a few clicks thanks to the platform’s library of over 125 design templates. Each template is responsive and very easy to set up. Whichever design template you choose, you are sure to leave a lasting impression on your new contacts.
With this powerful platform, you can also automate your email marketing efforts, including your welcome email workflow. An email workflow is a sequence of automated emails that are sent when a specific subscriber behaviour or data has been triggered. This enables you to send emails to the right contacts at exactly the right time. By automating your email busywork, you can streamline the customer onboarding process, simplify the customer journey, and nurture your leads in a way like never before. Along with this, it also frees up your valuable time to take on other marketing or business activities.
The platform also offers you the ability to create subscription forms where you can capture the contact information of your prospects. With it, you can make a beautiful subscription form with custom design elements and input fields. The form can be configured to show up at the right time, and can be embedded directly onto your website to make collecting information easier.
It also comes with a reporting feature that gives you a brief overview of which emails are performing and underperforming. These insights can be used to help you craft a far more effective email marketing campaign in the future.
If you want to learn how to set up a welcome email workflow using the platform, here’s a step-by-step guide on how to do it:
ActiveCampaign Tutorial: Setting Up a Welcome Email Workflow
First things first, click here to sign up to ActiveCampaign, then you need to create a subscription form.
How to Create a Form
You can create subscription forms in the Forms section of your ActiveCampaign account. Here’s a step-by-step guide on a how to do it:
1. To get started, click Site (globe icon) on the left panel of your account.
2. Click Forms under the Site menu.
a. If it’s your first time to create a form with ActiveCampaign, a “Create a form” modal will show up on your screen. Click on the
Create a Form button.
b. If it’s not your first time to create a form with the platform, click on the
Create a Form button located on the upper right part of the screen.
3. Input the name of your form and select the form style that you want to use. In this guide, we’ll use Modal Form as an example.
4. Click on the
Action
drop-down menu and then select the action of your choice. You are free to choose whichever option is available from the drop-down menu, but we’ll select the action
“Subscribe to a list” in this guide.
Note: There is no limit to the number of actions that you can add to a form. Actions can be updated and more actions can be added during the creation process of the form or after it has been published.
5. Click on the
Options
drop-down menu to pick an option to match your action. In this drop down, the items displayed will vary depending on which action you select. For example, choosing the
“Subscribe to List” action will require you to choose which list contacts will be subscribed to from the “Options” drop down menu.
6. Once you’re done with the form, click the Create button on the lower right of the pop-up box.
How to Set Up Automation Triggers
You can set up automation triggers on your form after creating it.
- To get started, click Trigger Automation on the upper right part of the screen.
- Click the + button to add an action. In this example, we'll pick the action Send an email as we want our new subscribers to receive a welcome email.
- Choose the email that you want to send to your new subscribers. If you haven't created an email yet, you have to make a new one.
- Click on Active in the upper right part of the screen to activate the automation.
Here's how the automation works:
1. When a contact activates a trigger action like “Contact subscribes to any list”, an initial welcome email will be automatically sent following the trigger.
a. To achieve this, go to the Modal Form you created, click on the Trigger Automation button, and then click Send an email under the Sending Options menu. The automation will then proceed to send the first welcome email to your contacts.
b. The automation waits 1 day. (You can adjust the wait step to your own preference.)
c. The automation proceeds to send the second welcome email in the series.
d. The automation waits 1 day. (You can adjust the wait step to your own preference.)
e. The automation proceeds to send the third welcome email in the series.
f. The automation ends.
Leads who opened the email will receive a follow-up message that is more in depth than the initial one. As for the leads who didn’t open the welcome email, you can craft a new one with a reworked subject line and messaging if you prefer.
How to Publish your Form
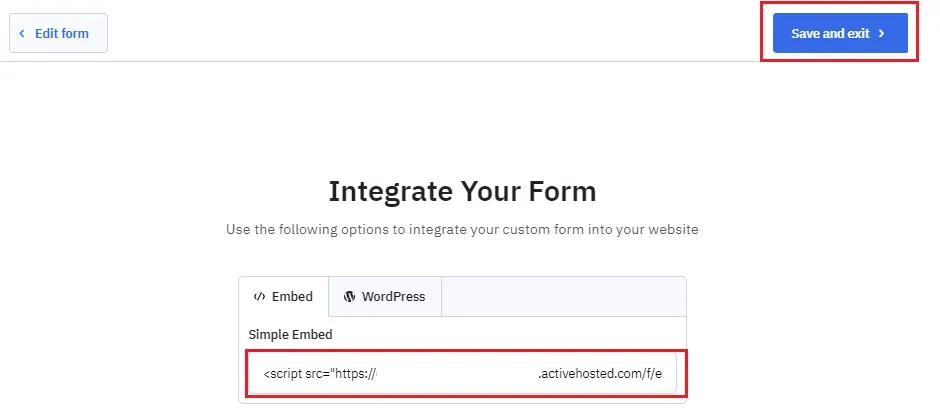
Now that your form is good to go, it's time to publish it on your website. The Integrate button shows all the options available for publishing your form. These form types have the following publishing options available:
• Simple embed code - Copy the code and paste it onto the webpage where you want the form to appear. Click Save and exit when done.
• WordPress – If you have a WordPress site, use the ActiveCampaign WordPress plugin to publish the form on your website. Click Save and exit when done.
Here are a couple of forms that we made for a client using ActiveCampaign:
Takeaway
As you can see, ActiveCampaign is indeed one of the best email marketing tools for digital marketers and businesses. But if you find that ActiveCampaign is not working out for your specific needs, there are many ActiveCampaign alternatives out there that are worth exploring.

Love My Online Marketing has 10+ Years of working alongside businesses and helping them grow. Discuss your options for online success from website Design and Development through to Google Marketing.
Do you want more traffic and business leads?
Love My Online Marketing is determined to make a business grow. Our only question is, will it be yours?


