Crown Street, Wollongong, 2500

How to Set Up an Email Marketing Campaign With Mailchimp
Melody Jaimon • October 1, 2024
Boost Engagement with Expert Email Marketing Campaigns Using Mailchimp
Studies show that email usage is set to surpass 4.48 billion users globally by 2024, marking a 3% increase from the previous year and covering more than half of the world's population.
Yep! Email’s still very popular in this new era of Mobiles and social media channels.
In a nutshell, email marketing is a powerful way to connect with people. Think about your own experiences daily. For instance, do you even know anyone who doesn’t have an email address? Every one of us probably receives several emails each week. We read their content, get inspired by them, and even take action as per the call-to-action provided in the email. The emails have been seamlessly embedded into our daily routine.
Email marketing is one of the best ways to reach your target customers; undoubtedly, it works best when it is personalised. Email can be customised to customer likes, actions, and preferences so that every communication is tailored to their interest. You cause topics like the promotion of your company and activities in your company, request feedback, or update your customers with any new offers; the list is indeed endless.
This article provides a step-by-step guide on how to create an email campaign in Mailchimp. Mailchimp is an all-in-one marketing platform that helps you manage and talk to your clients, customers, and other interested parties. Mailchimp's approach to marketing focuses on healthy contact management practices, beautifully designed campaigns, and powerful data analysis. It is a fantastic tool for achieving cost-effective campaigns, be it email campaigns, landing pages, or automation—leverage expert design and copywriting to boost engagement through Mailchimp.

Tips to set up an Email Marketing Campaign with Mailchimp
Just before we begin
Make sure that:
- You already have subscribers in your audience in order to send an email. If not, you can import your contacts or ask people to join you with a signup form. You have an idea of what you want to say in your email. It should be brief but not too brief—no one likes reading a poorly written email.
- To publish your first email, you must
verify your email’s domain. This is a quick and easy process that will only take about five minutes. The email address you use to sign up for the Mailchimp account has to match the website domain name to which you want to send your emails. If not, please contact our support team for help with this step!
Step 1: Sign Up
Sign Up with
Mailchimp, or if you have already created an account, just sign in. Signing up with Mailchimp is free. It gives up to 500 contacts with a monthly email send limit of 1,000 sends (daily limit of 500) in their free plan. Get Started with a Free Account and Upgrade to Use Powerful Advanced Features! Advanced Testing Tools. Re-marketing Ads. Audience Targeting. Bounce Rate Management. Automatic Email Solutions. Predicted Demographics, and so on.
Step 2: Create an email
To create an email campaign, make sure to do these steps:
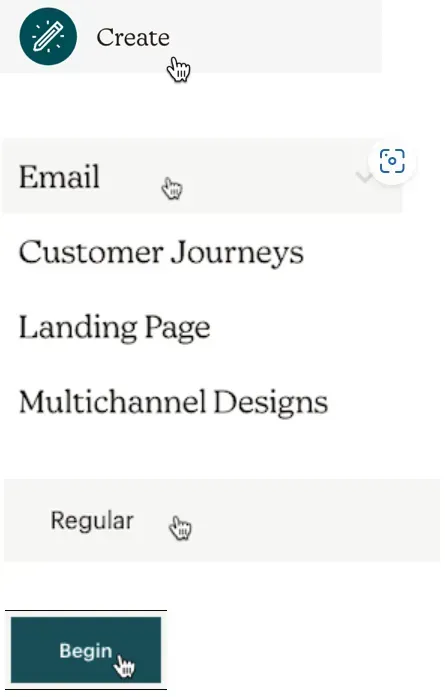
- Create a new email campaign in Mailchimp
- Select the Create icon.
- Select the Email drop-down.
- Select Regular.
- Input a campaign name and click Begin. This will take you to the builder, where you’ll choose your settings and design your content.
- Add the people you want to send the campaign to, including any segments that are relevant.
- Write the copy for your email and include a catchy subject line (this is especially important if you want to increase open rates).
Step 3: Setup and design
The email builder lets you complete your emails in any order and review all the parts before sending them.
Before you send your email, there are four essential tasks to perform:
- Add recipients to the To line.
- Add your name and email address to the From section.
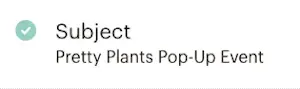
- Add your subject line in the Subject box.
- In the Content section, you can design your email.
As you complete each task, a green checkmark will appear next to the corresponding area. You might want to change your tracking options or other settings (such as what constitutes a complete or incomplete task). You’ll find that Mailchimp is easy to use and makes it simple to create an email that will connect with your recipients on an emotional level.
Add recipients
Here are some steps to help you choose your recipients.
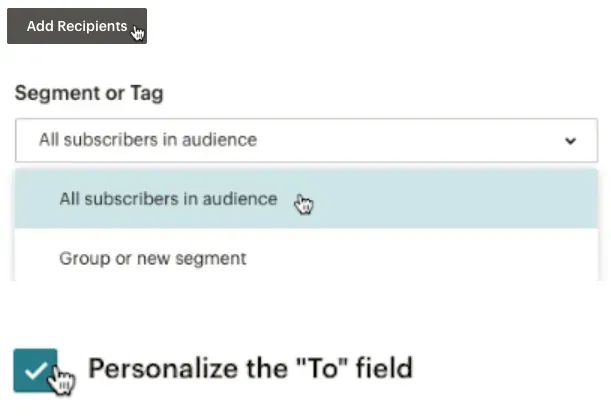
- Click To, then click Add Recipients.
- To choose an audience, go to Audience and select from the drop-down list.
- In the Segment or Tag drop-down menu, select All subscribers in the audience. Or create your own group of subscribers based on a tag such as location or interest—for example, Melbourne City professionals who enjoy cooking.
- Optional: If you'd prefer to see the recipient's name instead of their email address in this field, check the Personalise the "To" field box. In this section, you can give your email an authentic feel by setting it up to look like a personal message (instead of simply being sent from the website's default address). After checking the box and choosing a merge tag as instructed below, you'll be able to place whatever field information in your "To" line that is most relevant or helpful. For instance, if you choose |FNAME| for recipient Bob's name, he will see "To: Bob" instead of the address used to send emails. The default options are |FNAME| and |LNAME|, but you can also click Custom to enter an alternate tag or text.
- Hit Save.
Send to a custom segment or group
Here's how to send a campaign to individual subscribers or groups of your audience:
- In the Audience drop-down menu, select your target audience.
- Select the Send to drop-down and choose Target contacts.
- Create the segment of people you would like to target by clicking the + Add filter button. To learn more about how to use segments, check out Create and Send to a Segment.
- Click the Review segment. Then, when you’re ready, select the Apply segment button.
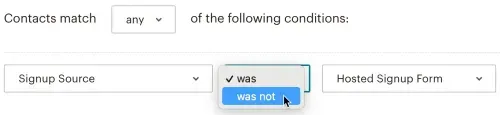
Exclude contacts from a campaign
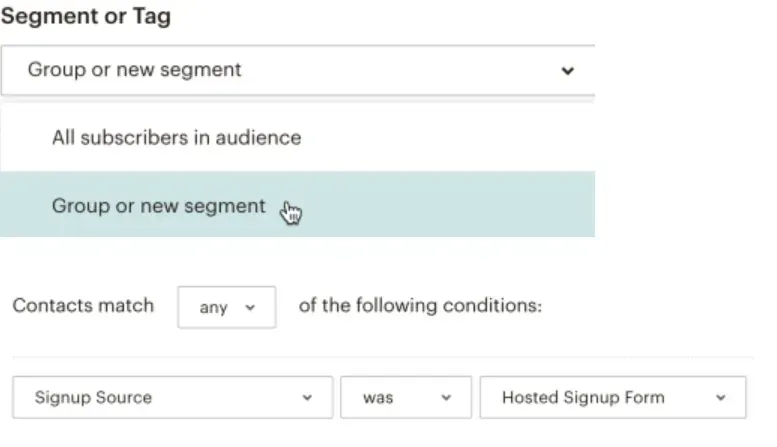
You can exclude contacts from receiving a campaign by using the segment builder in your MailChimp account. To exclude a particular group from your audience, use the opposite of the modifier you would normally apply.
If, for instance, all of the people in a segment joined your audience via a hosted signup form—and no other channel was used to connect them with your brand—that segment would be built as Signup Source | was | Hosted Signup Form.
To exclude all contacts who joined via your Hosted Signup Form, build your segment as follows: Signup Source | was not | Hosted sign-up form.
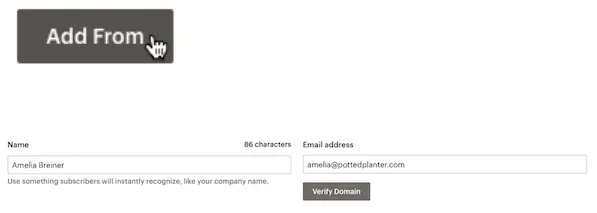
Add from name and from email address
To set your from name and email address, do the following:
- In the From section of your email builder, select Add From.
- Type your from name and email address. You may need to provide verification that the domain in your email address belongs to you.
- Hit Save.
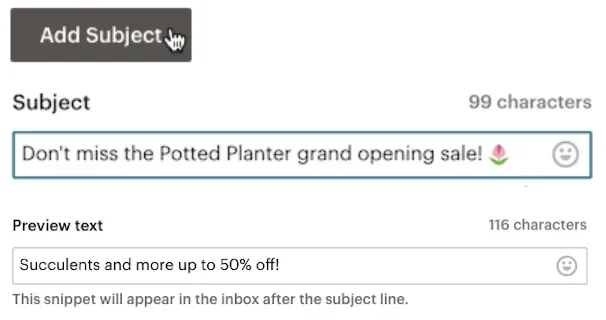
Add subject
To set your subject line and optional preview text, perform the following steps:
- To add a subject to your email, click Add Subject in the Subject section of the email builder.
- In the Subject field, enter a concise subject for your email that will let recipients know what is in it.
- (Optional) In the Preview text field, you can enter up to 150 characters. Your preview message will display in your recipient's inboxes if entered.
- Select Save.
Design email
Mailchimp offers tools and templates that help experienced and novice email marketers create professional campaigns. You can work with the new inline email builder or our drag-and-drop classic email builder—it's up to you! MailChimp has a free plan that allows you to have up to 500 contacts with a monthly email send limit of 1,000 sends (daily limit of 500). For $19 AUD/month*, the
Essential plan gives you access to various features, including automation and A/B testing tools. If you need more than 1,000 emails per month or want advanced features like integrations with other apps, then you'll want to upgrade to one of MailChimp's paid plans.
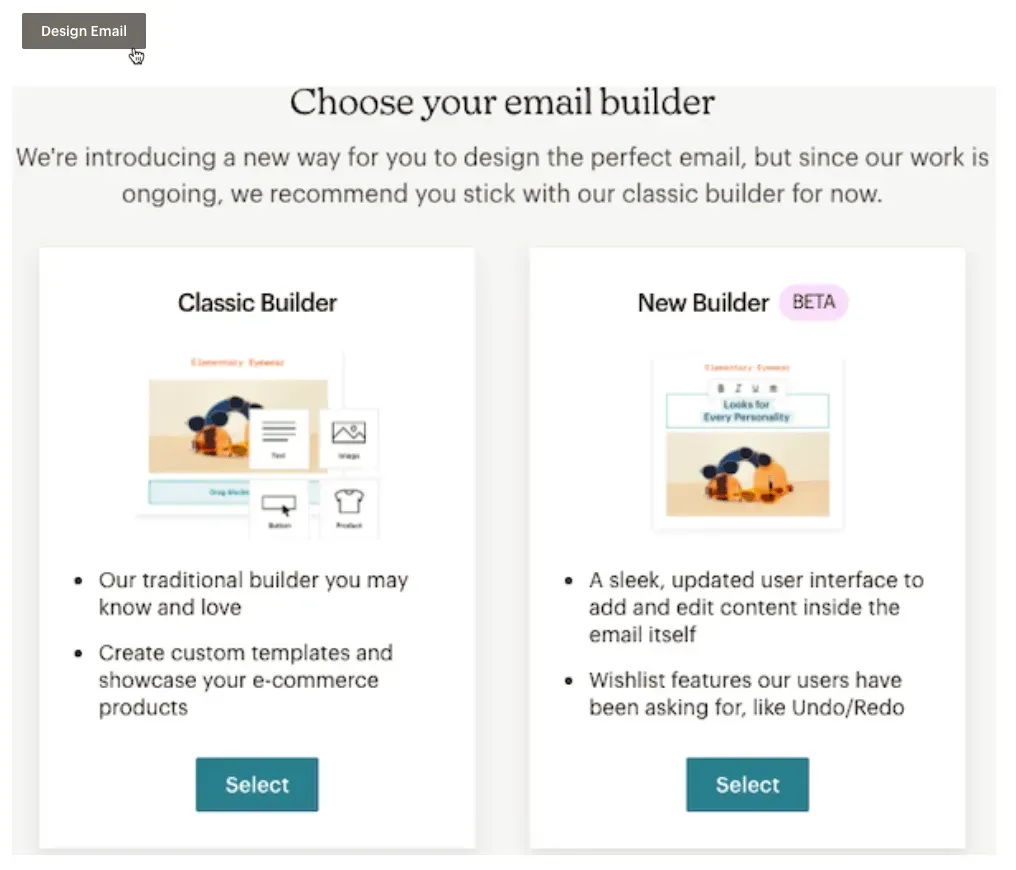
Click the Design Email button in the Content section to design your email. Then, decide whether you want to create a Classic Builder or a New Builder.
Here's a rundown of the options and their benefits:
- Classic Builder
- The classic builder allows you to use email templates, e-commerce features, and Creative Assistant. Drag and drop content blocks or code them manually. Click Design an Email with the Classic Builder to learn how to use this builder.
- New Builder
- The new builder enables you to directly insert and modify content in your own layout. The new builder supports your marketing endeavors with the Creative Assistant, Apps content block, and many other features. For more information about this builder and how to use it, click Design an Email with the New Builder.
If you choose the same email builder twice a row, it will become your default. You can change the default email builder by adjusting the settings in your Account Details. To change builders, click Switch Your Default Email Builder.
For more information on how to use each email builder, see the following article About Mailchimp's Email Builders.
Settings and tracking
Mailchimp automatically enables certain tracking options in your regular emails. You can use this tool to track all of your digital marketing campaigns, including both the number of times people open and click links in your email messages as well as how many sales are made through an online store that is connected with MailChimp.
MailChimp also offers additional tools that can help track the results of your marketing campaigns. The company’s “Segment by” feature lets you filter out any emails that were sent to people who did not open them or click on any links within those messages. You can also use MailChimp’s “Save as Merge Tags” tool to copy and paste a list of merge tags into your email template so that they are automatically added to each message that goes out from MailChimp.
To change your tracking options, do the following:
- Navigate to the Settings & Tracking section and select Edit.
- Check the boxes next to the tracking options you want to allow.
- Hit Save.
Other settings
You can also manage subscriber replies in your Mailchimp Inbox and auto-convert embedded videos in the Settings & Tracking section. For additional information, check out the following articles.
Step 4: Send campaign
Once you’ve completed the To, From, Subject, and Content sections of the email builder, a green checkmark will appear next to each section. This indicates that your message is complete and ready to send.
You can also schedule your email if you have a Mailchimp Standard or higher plan. To change your subscription plan, visit the plans page in your account.
When you are prepared to send your email to your contacts, you should go through the following steps.
- In the Send time section, select Add send time.
- Choose Send now, then click on Save.
- Finally, click Send.
Reminder: Your email can't be stopped or edited after you send it. Though, Premium accounts have the chance to cancel sending emails with more than 10,000 recipients after they sent it.
A well-designed email helps grab attention, ensuring that readers are drawn in and willing to explore further. Mailchimp’s design tools allow businesses to create emails that are not only visually appealing but also optimised for mobile devices, a critical factor given the growing number of users accessing emails on their phones.
On the other hand, compelling copy is what drives action. It's important to craft messages that speak directly to the recipient’s needs. Effective copywriting in Mailchimp emails should be concise, engaging, and aligned with the campaign’s goals, whether it’s to promote a product, share updates, or encourage sign-ups.
Here are the strategies for creating an impactful email marketing campaign using Mailchimp, focusing on design tips and copywriting techniques that capture attention and drive action.
Designing for Maximum Impact in Mailchimp
Use Eye-Catching Templates
Mailchimp offers a variety of pre-designed templates that you can easily customise to fit your brand. Whether you’re sending a newsletter or a promotional email, start with a template that best suits your goals.
Design Your Custom Email
Mailchimp provides a variety of pre-built templates, but if you want a fully custom design, select the Custom HTML or Code Your Own option.
- Add Content Blocks: Use the drag-and-drop editor to add different content blocks such as text, images, buttons, social links, or dividers. You can customise each block by clicking on it and editing the settings in the right-hand sidebar.
- Customise Your Layout: Rearrange the order of content blocks to suit your design. Add columns, change background colours, and adjust padding to create a structured, visually appealing email.
- Insert Your Branding: Upload your logo, use brand colours, and apply your company’s fonts to maintain consistency with your other marketing materials.
- After designing your custom email, click on Preview to see how it will look on both desktop and mobile devices. Mailchimp offers an Inbox Preview feature (available on paid plans) to show how your email will appear in various email clients.
- Once you're happy with the design, proceed to the
Settings
to fill in the subject line, sender details, and any other necessary campaign information.Lastly, select your audience list and either schedule the email for later or send it straight away.
Stick to Your Brand Style
Make sure your emails consistently reflect your brand's identity and overall aesthetic. This includes using the same colour schemes, fonts, and logos as your website and other marketing materials.
Images and Visuals
While text is essential, visuals can enhance your email’s appeal. Use high-quality images that are relevant to the content and make sure they load quickly. Be mindful of file sizes, especially for mobile users.
Whitespace and Layout
Don’t clutter your emails with too much information. Use whitespace to make the email more readable and organise your content into sections with clear headings. This helps guide the reader through your email smoothly.
Optimise for Mobile
As noted, a large portion of your audience will be reading emails on their mobile devices. Use Mailchimp’s responsive design tools to ensure your layout is mobile-friendly. Always preview your emails on both desktop and mobile before sending them.
Crafting
Expert Copy for Your Campaign
Here are some copywriting tips to boost engagement:
Use a Personalised Approach
Personalisation goes beyond just including the recipient’s name. Tailor the content of your email based on the recipient’s past behaviour, preferences, and where they are in the customer journey.
Create Urgency
Instil a sense of urgency to prompt quick action. Phrases such as “Limited time offer” or “Only a few spots left” can encourage faster responses.
Focus on Benefits, Not Features
Instead of merely describing your product’s features, concentrate on the value it provides to the user. For instance, rather than saying "Our software includes a new feature," you could say "Save time with our newly introduced automated scheduling tool."
Keep it Concise
People’s attention spans are short, especially when reading emails. Keep your message clear and to the point, with short paragraphs and bullet points where necessary.
Use Engaging CTAs
Your CTA should be specific and action-oriented. Rather than using “Click here,” opt for something more compelling like “Claim my discount” or “Secure my spot.”
Test, Optimise, Repeat
Use Mailchimp’s A/B testing features to test different versions of your subject lines, copy, and CTAs.
If you are looking at outsourcing your email marketing, Love My Online Marketing is an
agency partner with Mailchimp that can assist you. Contact us by clicking on the below button.


Love My Online Marketing has 10+ Years of working alongside businesses and helping them grow. Discuss your options for online success from website Design and Development through to Google Marketing.
Do you want more traffic and business leads?
Love My Online Marketing is determined to make a business grow. Our only question is, will it be yours?