Crown Street, Wollongong, 2500

Orders
Melody Jaimon • August 1, 2022
View Orders
To view your orders:
- Select eCommerce in the editor's sidebar, and then click Manage Store.
- Click My Sales, followed by Orders.
Here you can view all pending, completed, and shipped orders. Use the filters on this page to locate or evaluate specific orders.
Order States
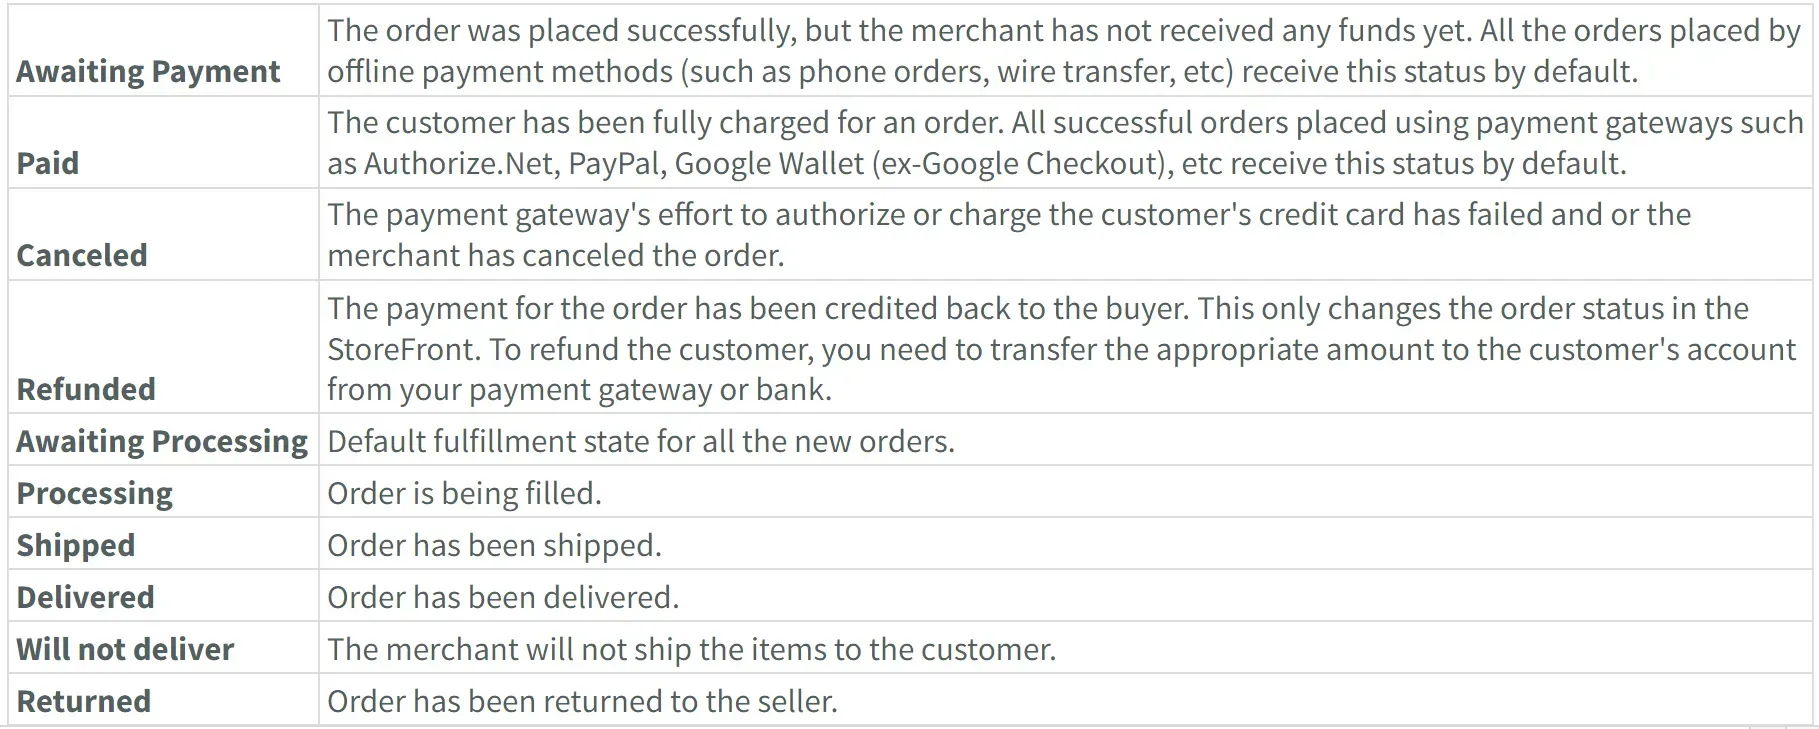
Each order has two states: payment order and fulfilment order.
Unfinished Sales
The Unfinished Sales page in the Store Control Panel shows all the orders that were started but not paid for by the customer. This could be because:
- Customers leave the checkout page to go back to the shop to add another item or look over what they have in their cart.
- The customer decided not to buy something.
Each line in the unfinished sales table has a short description of the order (date, total cost, payment method, items in cart), customer email (so you can contact the customer to find out why they haven't finished the order), and the
Place this order button. When you click
Place this order, the order you chose is added to the list of regular orders and given the status "Awaiting Payment." The customer will then get an order confirmation, just like when they place a new order. In this case, the StoreFront won't automatically charge the customer's credit card, so you'll have to do it yourself. When a full order is marked as "Awaiting Payment" or "Paid," the number of items in stock goes down.
The StoreFront does not collect or store money from sales. Instead, it helps you sell your products and charge your customers. All of your sales go straight to the account of your payment gateway. If your payment gateway (such as PayPal) is not set up to send your money to your bank automatically, you will need to contact them.
If an offline payment method was used to place an order, like "Phone ordering" or "Pay by check," the StoreFront creates a new order in the database and stores the customer's information. Since no actual charges are made, you need to contact your customer for payment.
Order ID
Each order is given an order ID, which helps the merchant tell one order from another. It's on invoices, emails to clients, and the order list for the Store. The order ID is a random string of 5 letters and numbers that is made when the order is placed. For instance, the order IDs 10N87, Y0RZ4, and QR13V are all correct.
We have changed the way order IDs look as of November 2021. All Stores that were made before this date will use the old order ID format, in which the first order ID starts at 1 and all the others follow in order. For example, the order ID for the first order will be 1, the order ID for the second order will be 2, and so on.
Add Prefix or Suffix
If you have more than one Store, adding a prefix and/or suffix to your order ID can help you tell which orders came from which Store. The order is changed to prefix-orderID-suffix. For instance, your order ID could be Petstore-1Y56Z-2021, where "petstore" is the prefix, "1Y56Z" is the order ID, and "2021" is the suffix.
To add a prefix or suffix:
- Click eCommerce in the editor's sidebar, then click Manage Store.
- Click the Settings tab, followed by the Cart and Checkout tab.
- Select Edit Order ID Format from the Order ID section.
- Prefix and suffix are added.
- Click
Save.
Order ID Troubleshooting
If your Store was made before November 2021, the Sales page can not have any order IDs. For example, if you have an order ID of 10 and the next order ID is 14, but there are no orders with IDs of 11, 12, or 13, then the next order ID is 14. This can happen if a customer starts the checkout process but doesn't finish it. When the transaction doesn't finish, Store makes a hidden, incomplete order that isn't shown in the orders table.
Assign Tracking Number
To give an order a tracking number, do the following:
- Click eCommerce on the left side of the editor, then click Manage Store.
- Click My Sales, then click Orders.
- Click the drop-down menu next to Update for the order in question and choose Mark as Shipped.
- Enter the tracking number and then click "Mark as Shipped."
In the email to the customer, the tracking code and URL are sent. Check that the "Order Shipped" notifications are turned on if your customer doesn't get a message. You can also change the text of these alerts or translate them.
If you don't see the
Mark as Shipped option, it's probably because the order doesn't have a shipping method. This happens when the items you ordered don't need to be shipped. On the page for each product, there is a setting that says "This product needs to be shipped." This setting is turned on by default for every product. If it's turned off, the product is considered virtual in the StoreFront, so you can't give the orders a tracking number.
Enable Shipping Notifications
To enable shipment notification:
- Click eCommerce in the editor's sidebar, then click Manage Store.
- Select Settings, followed by Notifications.
- Enable the switch next to Order Shipped.
If necessary, you can review the notification's content by clicking
Edit. The notice should contain the following code:
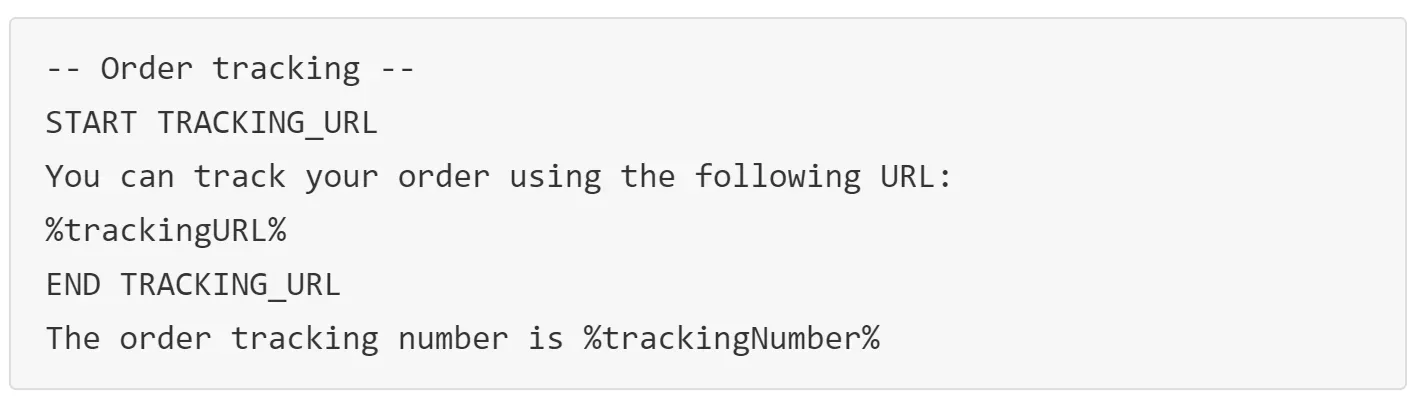
Because the StoreFront does not know which shipping carrier you used when you use user-defined shipping, it does not include a tracking URL in emails. There is only a tracking number included. To resolve this, manually add the URL to your notification.
Change the above code to this one:

You can replace the UPS tracking URL in the previous example with any other carrier's URL.
Print Order Invoice
To print a order invoice:
- Click eCommerce in the editor's sidebar, then click Manage Store.
- Click My Sales, followed by Orders.
- Click
Print Order besides the relevant order. Use the checkboxes to select multiple orders, then pick
Print Selected
from the Bulk Actions option.
Deleted Products
If you have removed a product from your Store and are no longer selling it, you can still check orders for that product in the Store Control Panel.
To view deleted product orders:
- Click eCommerce on the left side of the editor, and then click Manage Store.
- Go to My Sales and then click Orders.


Love My Online Marketing has 10+ Years of working alongside businesses and helping them grow. Discuss your options for online success from website Design and Development through to Google Marketing.
Do you want more traffic and business leads?
Love My Online Marketing is determined to make a business grow. Our only question is, will it be yours?