Crown Street, Wollongong, 2500
Connected Data
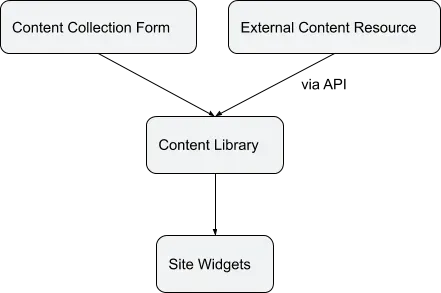
Connected Data enabled you to link site widgets to data stored in external sources as well as the site's Content Library. This allows you to build websites quickly, maintain them up-to-date and correct, and assure site-wide consistency of important information. When site widgets are connected by Connected Data, the data in each widget is managed by the Content Library.
Collect and Edit Data
Connected Data Structure
For data to be connected through Connected Data, it must have a label and some content.
- Label. The label is a unique identifier of the content in the library that links it to the widget on the site. Ensure that the labels you select are relevant and unique. This allows you to simply select which content element should connect to which widget and prevents further label changes. Changing the label of the Content Library when a widget is linked will detach it.
- Content. The information (such as text, a picture, or a phone number) resides in the Content Library and, once attached to a widget, is shown on the site.
Text and images may be used to populate the Content Library. Each text section in the Business information may contain up to 4000 characters.
Some Content Library fields have labels that are preset. For instance, the labels for the Logo and Social icon fields are preset. Other fields, such as Collections and non-default business text fields, have custom labels that you must specify yourself.
The material must be saved in the Content Library in order to link widgets using Connected Data. There are many ways to contribute information to the Content Library:
- Manually. Click Content on the left panel to access the Content Library and upload content such as company information (addresses, phone numbers, social links, etc.), text, and images.
- Collect from Client Form. All content that your customer submits through the content collecting form is automatically put into the Content Library.
- API. Use the content library API to push content to the Content Library and connect it to the various widgets on the site. This is particularly helpful if you keep business data in an external source (for example, Salesforce, your own contact form, and so on).
If you are populating the Content Library using the API, keep in mind that the site may also be republished via the API.
Connect Data
The data you can link to your website's widgets are summarised in the table below.

SEO Fields
You can link the SEO Title and SEO Description to any Content Library text field.
Connect Data to Site Elements
There must be content in the Content Library to link data to site components. The option to Connect Data does not display on the site if there is no content.
To link data to site elements, do the following:
- Right-click the widget you wish to link to a data field and click Connect to Data Field.
- To connect to data, select Connect to data from the context menu.
- Select the data field to which you wish to attach the widget in the Connect Data dialogue.
- Any widget to which you successfully link the Content Library's data is highlighted with a blue Connected Data icon.
If you link text data, the text will inherit the styles of Global Text. To modify the text style, navigate to the widget's design editor. The inline text editing option is unavailable for linked text widgets.
Edit Data
The content being synced through Connected Data can be modified immediately in the pop-up, the Content Library, or the connected external source. Remember to republish the site after making modifications.
At any time, the design of the interconnected site elements can be altered.
Inline Binding
Inline binding enables the usage of Connected Data for a single word or words within a text editor. The connected text may be created and linked in the same way that conventional text can.
For linked text, the Content Library design supersedes the text editor design.
To use inline binding:
- In the text editor, type {{{ to trigger the Connect Data dialogue.
- Select the desired label to which you want to link.
- Select Save.
During editing, the label shows within curly brackets in the editor (for example,
{{label}}). The connected text is displayed after the editor is closed. Clicking the Connected Data icon will reveal the connected text.
Only users with Connected Data see the icon, while everyone sees the label in curly brackets.
To link the text using inline binding, put the label straight into the text editor, enclosed by two curly brackets to connect the text using inline binding. For example, {{content_library.global}}
Disconnect Data
To detach an element from Connected Data:
- Right-click the widget and select the Change connection option.
- None is the option to pick from the menu.
If you are currently in the widget content editor for a widget with an editing menu, you may disconnect by hovering over the blue symbol in the upper-right corner and clicking
Disconnect.
When a widget is disconnected, the text and its style return to the previously used style.
Dynamic Filters
Dynamic filters may be used to filter widgets attached to collections in dynamic pages. This enables you to show just the material relevant to a page item. Dynamic filters are available via the Connect Data popup for any widget that links to a collection when added to dynamic pages, including: Gallery, List, Accordion, Slider, and Custom widgets.
Using Dynamic Filters:
- Click Content, then Collections on the side panel.
- Create two collections by clicking +Create Collection:
- Data collection. With a category name field, it contains your data. This collection is referred to as Collection A in step 9.
- Categories collection. Contains all of the categories as well as their specifics (category name, image, etc). This collection is referred to as Collection B in step 9.
- Click Pages in the side panel, then +New Page.
- Make a Dynamic Page out of each collection you made in step 2.
- Navigate to a normal page of your choosing, then select Widgets in the side panel and drag and drop the Gallery widget onto the page.
- To open the settings menu, right-click the Gallery widget and click Connect to Data. Connect it to the collection of categories you defined in step 2. Connect the link field to the Dynamic Page.
- Navigate to the Dynamic Page category and select Widgets on the side panel, then drag & drop the Gallery widget into the page.
- To open the settings menu, right-click the Gallery widget and click Connect to Data. Connect it to the data collection you generated in step 2 by clicking the Connect button. Before dismissing the Connected Data dialogue, go to the Filter & Sort tab and click +Add Filter in the Dynamic Filter area.
- Map between the data collection's (Collection A) category name field and the categories collection's category name field (Collection B).
Troubleshooting
- If the Connected Data option is in the widget's context menu, it is possible that the Content Library is empty. Ensure that there are data here.
- If you cannot locate a label in the menu, make sure the Content Library element you generated with this label has content. In Template mode, only empty labels can be connected.
- Verify that the widget is attached to the correct label if you do not see updated data in a certain widget.

Love My Online Marketing has 10+ Years of working alongside businesses and helping them grow. Discuss your options for online success from website Design and Development through to Google Marketing.
Do you want more traffic and business leads?
Love My Online Marketing is determined to make a business grow. Our only question is, will it be yours?


