Crown Street, Wollongong, 2500

A Guide to Understanding Square Inventory Management
Melody Jaimon • March 11, 2022
Inventory management is a component of supply chain management that tries to ensure that the right products are available in the right quantity at the right time. Businesses can cut extra inventory expenditures while increasing sales when done correctly. To make this process more efficient, effective inventory management can help you track your inventory system real time.
You might be thinking if using spreadsheets is a good idea. Sorry, but spreadsheets are not an efficient inventory tool since they must be maintained manually, which takes time and results in data that is virtually always out of date. Spreadsheets also can't increase your business, communicate with your point-of-sale system, or show you how well your things are selling.
Square Inventory Management can perform all of the tasks that a spreadsheet cannot. It provides capabilities for keeping an accurate count of in-stock items in your item library, which updates in real-time and allows merchants to monitor their inventory from any location.
What is Square?
Square is a type of point-of-sale (POS) system that allows merchants to accept payments through credit cards, debit cards, and other forms of online payments. Square is both a physical and a digital platform that helps businesses manage inventory quantities, sales, and customers. Square inventory management is one of the most widely-used and downloaded inventory management system apps on the market.
It is quick to set up and easy to use and may be accessed through a browser or downloaded. This inventory management software is available in both a paid and an unpaid version. The free version is good for businesses that have a limited number of sales transactions each month. Square can be downloaded through Google Play and the App Store, so it can help business owners track inventory, sales, stock count, and customers on their smartphone or tablet.
Getting Started with the Square Inventory Management
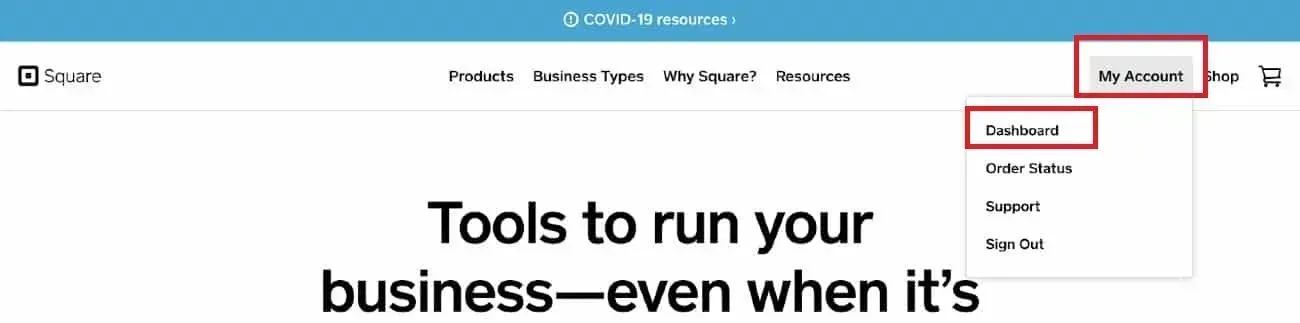
1. Create your Square account
Create a Square account and then log in using this link. Hover your mouse over the "My Account" text to reveal the submenu.
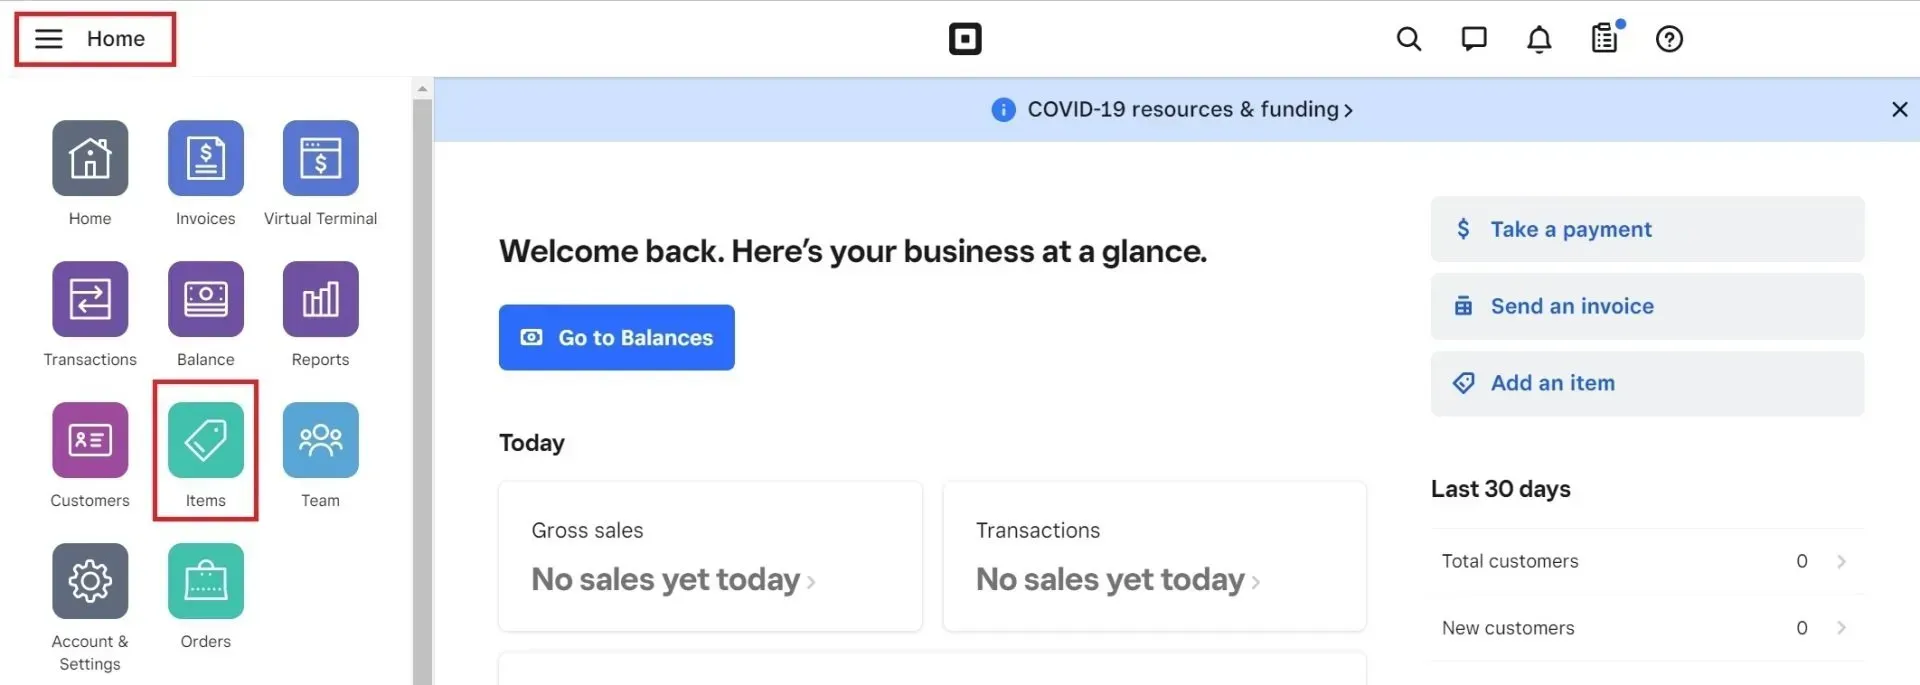
2. Main Dashboard
It will bring you to the main online square dashboard, which will include a vertically listing of text tabs on the left side. Select the "Items" tab from the drop-down menu.
3. It's faster and easier to bulk import inventory items utilising an XLS or CSV file for MULTIPLE inventory items.
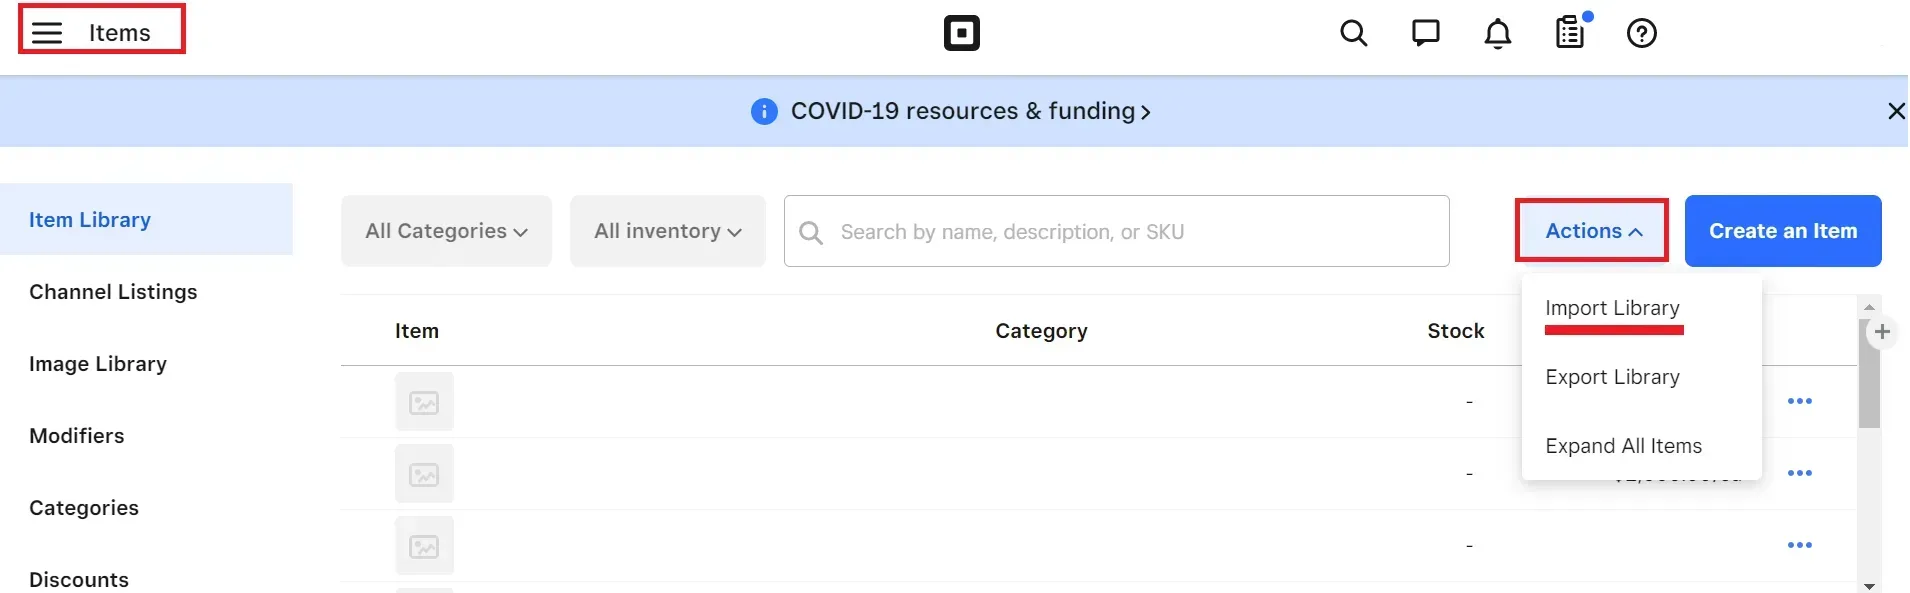
Look for the "Actions" button in the upper right corner of your online Square dashboard's "Items" section. Select "Import Library" after hovering over it.
- You have two options after choosing "Import":
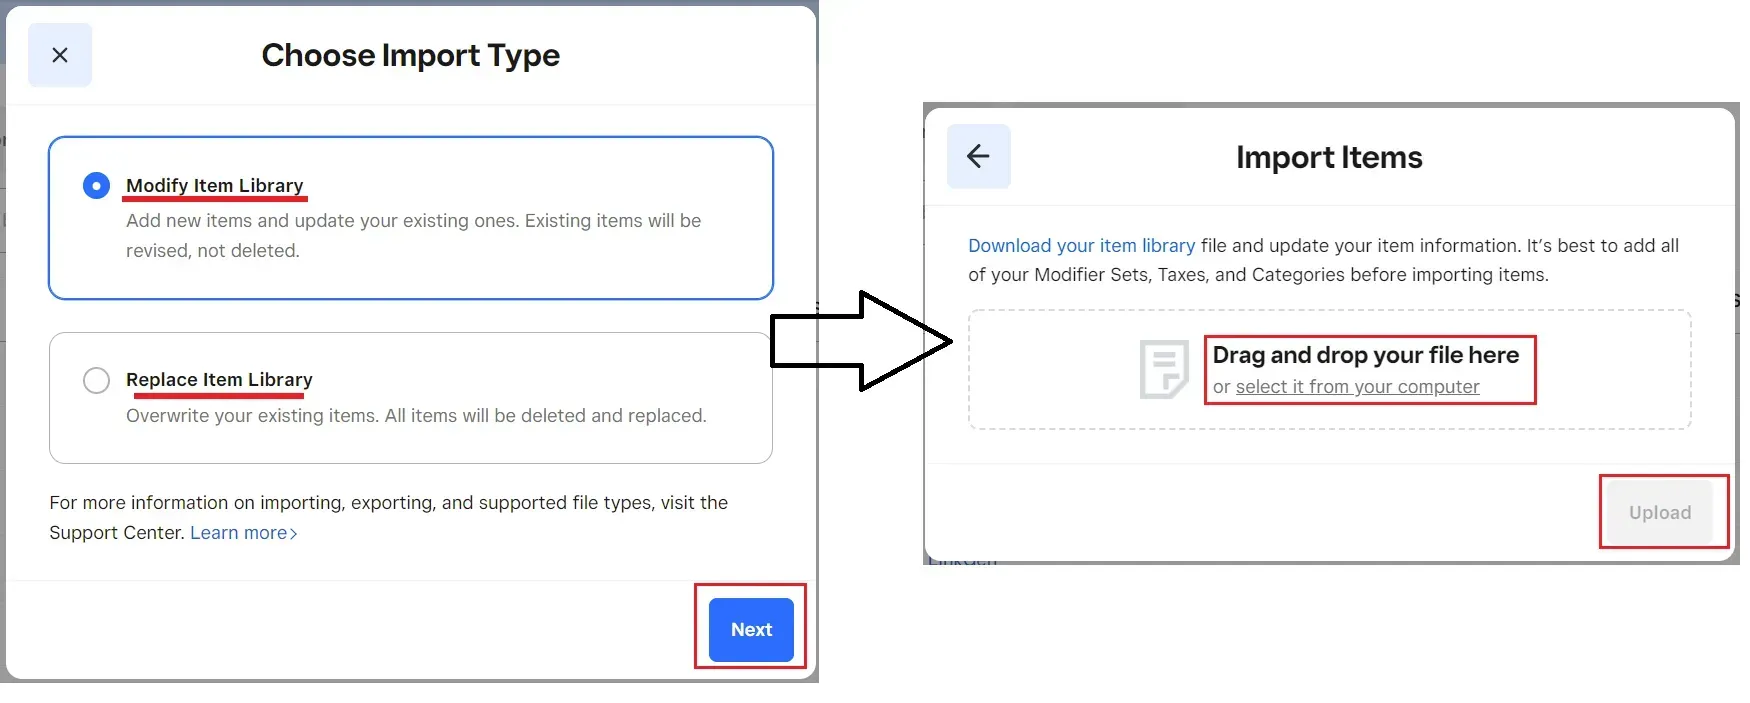
- If you want to add new products to your Square inventory management or update details for existing items, select "Modify Item Library." Keep in mind that when you adjust stock and make modifications to current item details from Square point of sale (for example, prices, names, descriptions, options, and variations) will necessitate a manual update. There will be no items removed from your product library as a result of this.
- If you want to remove an existing item and replace them with new ones, select "Replace Item Library." Please be aware that this may result in the deletion of your previous entries.
- Choose the option that applies to you and select "Next."
- Drag and drop your XLS or CSV file into the upload box, or click to pick your file, then click "Upload."
- Square will walk you through the steps of reviewing, editing, and approving the information. Once everything is in place, click the "Confirm" button in the upper right of the page.
4. To create one item at a time, go to the “Items” tab on the left-hand menu. Then click the “Create an Item” button.
- You can change the image or colour of your inventory item by clicking the square "Edit" box and then "Add Image." Click "Done" when you're finished.
- Then, in the "Name" section, type the name of your item and choose an inventory category for it.
- Select a category from the drop-down list by clicking on the "Category" field. If the category for the item isn't shown, you may click on the box and type in a new name.
- You can enter a description of the product and choose which locations sell certain products or services (optional).
- Click "Add options" if you ever need to set options. You'll identify internal and customer-facing options in this section. Then, to review your settings, click "Next." Click "Create # variants" to save your work.
- Enter the SKU, as well as the pricing structure (per unit, hour, pound, etc.) and the numerical price.
- If you need to change the specifics of a variation, go to the Variations section and select "Edit variation details."
- To increase the number of products offered, go to the "Manage stock" tab and select the "Stock Action" field from the drop-down menu.
- Turn on the "Tracking" toggle under "Locations and stock" to allow low stock alerts and keep track of continuing inventory numbers.
- Make a final check to ensure everything is how you want it, and then hit the "Save" button in the upper right corner of the screen to finish your item.
Square inventory management is affiliated with numerous web platforms, and here are instructions on how to connect each of them.
- For Love My Online Marketing, we will track both online and offline inventory and sales. Using this sync can help prevent discrepancies and overselling.
- Here’s how to connect with Square POS:
- Go to the Store Control Panel, click All Sales Channels, and click POS.
- Click Connect Square.
- Click Sync your inventory.
- You will be redirected to the Square Dashboard. Sign in to your Square account.
- Click Allow to provide the required permissions. The website and Square POS are connected.
- To populate your store catalogue with inventory management from Square, click Import products from Square. To sell offline with Square, you could Export products.
- To change the Square account your store is connected to, disconnect from Square. Go to the Control Panel, click All Sales Channels, click Square. To remove Square as a payment method, go to the Control Panel, click Payments and connect your store to another Square account.
Square Point of Sale Guide
Square Point of Sale is a great option for businesses that want to accept payments through credit cards, debit cards, and other forms of payment. Square Point of Sale is affordable and easy to use, making it a good choice for businesses of all sizes.
Start selling to Square Merchants who already have an account
Create an online store by downloading the Square app and signing up for an account. We'll transfer your Square goods into your internet store for you effortlessly.
To set up an online store, follow these steps:
- Go to the side menu of your Square account and click on Apps.
- Find the eCommerce section by clicking on it.
- Click Get Started under the app listing in the store.
- Click Allow to grant the requested permissions.
- Create a new store by entering your name, email address, and a password.
- To complete your registration, please answer the few questions.
All of your Square products are preloaded into your new online store, and Square payments are already set up.
Square POS can be used to connect the store
Existing store sellers can link their online store to a Square POS system to track inventory and sales both online and offline. This sync can assist avoid inconsistencies and overselling.
To link your online store to Square POS, follow these steps:
- Click All Sales Channels, then POS, from the Store Control Panel.
- Click Connect Square.
- Click Sync your inventory.
- The Square Dashboard will be redirected to you. Go to your Square account and log in.
- To grant the necessary permissions, click Allow.
Square POS and your web store are linked.
Click Import products from Square to add Square merchandise to your store catalogue. You can export products to Square POS to sell offline with Square.
Disconnect your store from Square to alter the Square account to which it is linked. Click All Sales Channels, then Square in the Control Panel. Go to the Control Panel, choose Payments, and connect your store to another Square account to remove Square as a payment method.
Synchronisation of Square POS and Store
Automatic two-way inventory, product catalog, and order updates (from Square to the Store and vice versa) are available to merchants who built their stores with Square POS.
Initial Product Import
When you build a new store with Square POS, you can import up to 10 categories and 70,000 products from Square. A future import may include more categories and goods. The following product information is transferred by this import:
- SKU (if a Square product does not have an SKU, the Square product ID will be used as the SKU)
- Name
- Price
- Image
- Description
- Options with titles and price modifiers
- Category
Catalogue Updating
To get things from Square, follow these steps:
- To access Square, go to Control Panel, All Sales Channels, and then Square.
- Select "Import items from Square" from the drop-down menu.
Your remaining products will be transferred to with updated stock levels.
Launch the Import from Square tool to add new items created in Square POS to your catalogue. This tool transmits the following product details:
- SKU (if a Square product does not have an SKU, the Square product ID will be used as the SKU)
- Name
- Price
- Stock level
- Image
- Description
- Options with titles and price modifiers
- Variations
- Category
While product stock levels are automatically synced, any changes to other product details (such as pricing, names, descriptions, choices, and variations) require a manual update.
- Go to the Store Control Panel, then to Catalog, then to Products.
- Remove the product from the catalogue that needs to be updated.
- Return to All Sales Channel > Square.
- To start the product details sync, click Import items from Square.
Reminder:
When you remove an item in Square that you no longer want to sell, you must manually remove it from your store in Control Panel > Catalog > Products.
Products for Export
If you create a new product, you can upload them to your Square account and sell them in your store:
- Select Store Control Panel > All Sales Channels > Square from the drop-down menu.
- Click Export products.
The following product information will be transferred using the Export tool:
- SKU
- Name
- Price
- Stock level
- Description
- Options with titles and price modifiers
- Variations
- Category
Updating Inventory
- Square Register has the option to sync your inventory and sell offline.
- Both systems have the same SKU numbers for products.
When both of the following are true, we automatically sync product stock levels between your business and Square to ensure accurate stock counts and prevent overselling.
We update your product inventory level (for matched SKUs) within minutes after a new order when you sell with Square. When products are purchased from your online store to keep your product stock levels up to date, a reciprocal procedure happens.
Orders Synchronisation
To enable automated order sync from your store to Square POS. Go to Store Control > All Sales Channels > Square and sync your inventory and sell offline with Square Register. If all of the following are true, your orders will sync:
- Square payments were used to pay for the order.
- Square Register has the option to sync your inventory and sell offline.
Set up a Pickup Location for Orders
If you provide pickup at many locations, synchronising your Square POS with online pickup orders and retail locations is critical. In your store's Control Panel, you must assign a pickup location to each pickup option. To enable a pickup option and designate a pickup location, follow these steps:
- Select Control Panel > Shipping & Pickup from the drop-down menu.
- Select Add In-Store Pickup from the drop-down menu.
- Enter a name for the pickup option, as well as customer instructions and pickup date and time.
- From the list of active locations on Square's Dashboard, choose the desired store address. Make sure your Square Dashboard has your store locations turned on. Visit their Support Center for more information on managing locations.
- Select Add Pickup Option from the drop-down menu.
When a consumer chooses pickup at checkout, their order will be paired with the relevant Square Dashboard business location.
Benefits of Using Square
There are many benefits to using Square Inventory Management System. Some of these benefits include:
- Increased sales: Square can help you track your sales and inventory, which can help you make better decisions about what products to stock and sell.
- Better customer service: Square helps you keep track of your customers so you can better serve them and increase loyalty.
- Easy to use: Square is easy to download and use, so there is little learning curve for business owners.
- Detailed Reporting: Square provides detailed reports about your sales, inventory, and customers. This information can help you make better business decisions.
- Affordable: Square's pricing is very affordable, especially when compared to other inventory management software options.
Overall, Square inventory management is an excellent option for businesses that are looking for a comprehensive inventory management system. It is easy to use, affordable and has many features that can help businesses increase their sales and better serve their customers.
Takeaway
It's an easy process, whether you're utilising Square's dashboard to import an extensive list of products or simply changing a few variables. As consumers place and finish their purchases, your store's stock levels fluctuate automatically, allowing you to stay on top of your inventory at all times. Click this LINK to create a free Square account and keep your inventory organised.


Love My Online Marketing has 10+ Years of working alongside businesses and helping them grow. Discuss your options for online success from website Design and Development through to Google Marketing.
Do you want more traffic and business leads?
Love My Online Marketing is determined to make a business grow. Our only question is, will it be yours?