Crown Street, Wollongong, 2500

Arrange Content
Melody Jaimon • September 22, 2022
How you organise the content on your website is important. Effective content organisation makes it simple for visitors to access the information they want and enables you to emphasise sections that might otherwise go unnoticed. A well-organized page makes your site appear professional and increases sales by making it easier for site visitors to locate what they are searching for.
Website Builder Structure
The Website Builder is composed of a header, a footer, rows, and columns. Every widget that is added is placed into one of these sections.
Widgets often consume a whole column or row, making them difficult to select. To avoid this, right-click the widget in the column or row you want to use, hover over the
Select Container
option, and then select
Column or
Row.

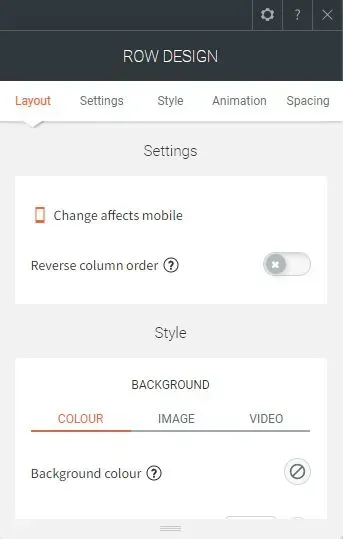
Rows
The horizontal sections of your site are called rows. These rows include the widgets and columns that you add to your site. Click the
reverse column order in the row editor to change how the content is shown in the mobile view.
By dragging widgets onto the site, you can add rows to your site. When you drag and drop a widget across rows or into an area where you want to add a row, a new row will be created
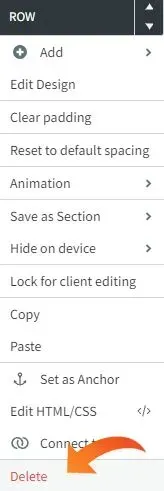
To delete a row, right-click anywhere on the row to open the context menu, then click
Delete. Click the
Row button at the top left of the row and then click
Delete.
Columns
Each row has at least one column. Columns hold and manage the order of all widgets on a site.
Each row could have up to four columns. When a new column is added, it displays next to the existing column in the row.
- Desktop and tablet views can hold up to four columns in each row, but mobile websites can only display two columns in a row at most.
- To add a row with two columns in mobile view, switch to mobile view and then add a two-column widget. Columns added in desktop or tablet views will assume the entire width of the page when seen in mobile view.
To remove a column, right-click anywhere to open the context menu, then click
Delete. You can also click the red
X in the column's upper right corner.
You can put widgets right into columns, or you can add inner rows to give the column more shape.
Inner Rows
Inner rows provide more design versatility by allowing the addition of rows inside columns. With the help of inner rows, you can change the column layout while maintaining the row's overall design (for example, background, spacing, bleed).
Inner rows can have their own background and spacing, can be split into up to four columns, and can have the order of their columns changed on mobile, just like regular rows. Any widget can fill a column in an inner row, but you can't add a column to an inner row.
Do one of the following to add a row inside a column:
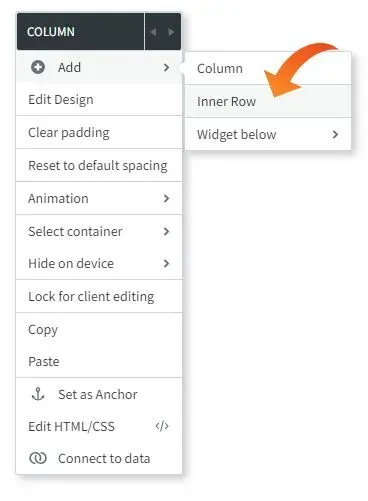
1. Right-click the row and click
Add Inner Row. If the row has several columns, select the column to which you want to add the inner rows.
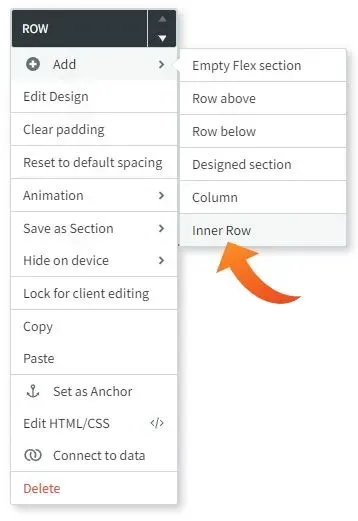
2. Right-click the column and click
Add Inner Row.
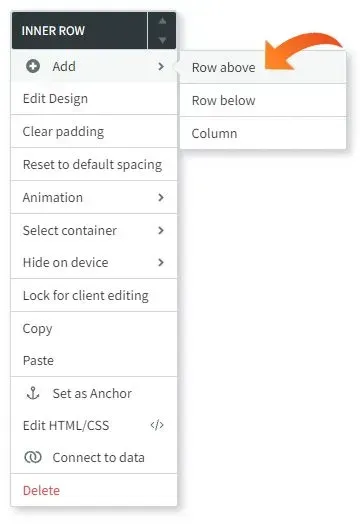
3. To add an inner row below the existing one, right-click the inner row and click
Add Row.
Inner Row Example
As an example of how to use an inner row, consider two possible layouts for a page with a title and three buttons:
- Add two rows. Put the title in the first column of the first row. Divide Row 2 into 3 columns. In each column, put a button.
- You can't use the same background image for two different rows, and you have to set the spacing and bleed style for each row separately.
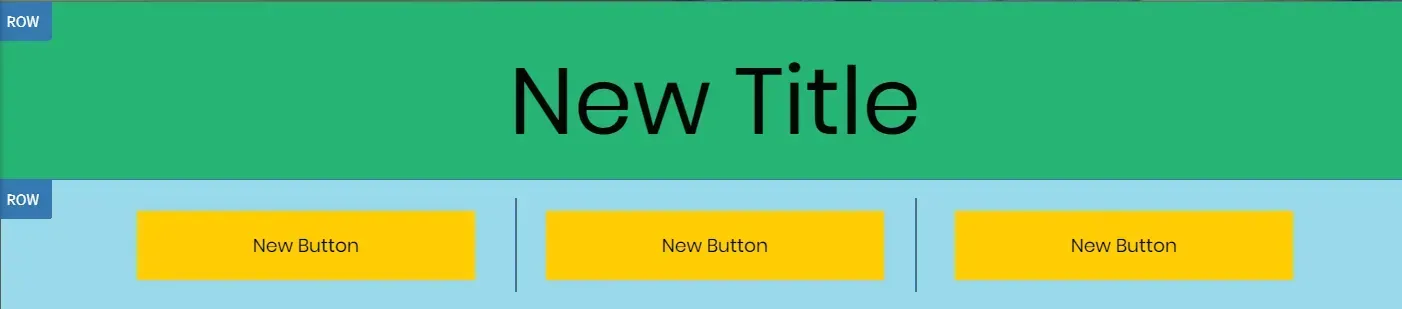
- Add a row. Every row has a column by default. Add 2 inner rows to the column. Put the Title in the first row. Divide inner row 2 into 3 columns. Put a button in each column.
- The background, spacing, and bleed for these two rows will be the same as for the main row.

When editing inner rows, here are some important things to keep in mind:
- The order switching arrows can only be used to change the order of the inner rows. To change the order of widgets and inner rows, drag and drop the widgets above or below the inner row manually.
- Widgets with 2 columns, 3 columns, or 4 columns can't be placed in inner rows. To add a column, right-click the row and select Add Column.
- Unlike regular rows, inner rows can't be copied and pasted.
Widgets
Widgets contain your site's text, images, buttons, and other content.
For your site to have widgets:
- Click Widgets in the left pane.
- Find the widget you want, then drag and drop it into your site.
To remove a widget from your site, right-click anywhere on the widget to open the context menu, and then click
Delete. You can also click the red
X in the widget's upper right corner.
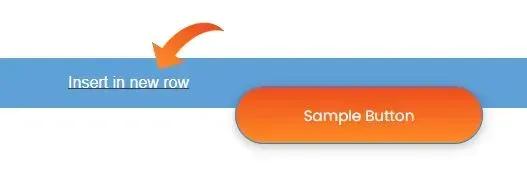
Drag a widget onto your site, create a column to the row where that widget is, and then drag another widget into that column to arrange widgets side by side. You can also drag the two-column widget onto your site and then drag and drop the widgets into each column.
Snap to Align
When resizing widgets in the same column, Website Builder tries to Snap to Align them so that they are all the same size. Website Builder leaps ahead or behind when you resize to snap to position. This should make making widgets of the same size simpler.
Snap to Grid
The Snap to Grid feature helps you place widgets on your site's pages in a way that looks professional. You can arrange widgets horizontally and vertically inside columns and rows using this system. Rulers are shown when an element is moved in its row or column or when the widget's size is changed. The things that are lined up have a coloured border around them. Depending on the use case, a widget can be aligned with more than one other widget.
In the views of the three different devices, alignment is possible (desktop, tablet, mobile).
To learn more, see
Add Widgets and
Edit Widgets.


Love My Online Marketing has 10+ Years of working alongside businesses and helping them grow. Discuss your options for online success from website Design and Development through to Google Marketing.
Do you want more traffic and business leads?
Love My Online Marketing is determined to make a business grow. Our only question is, will it be yours?