Crown Street, Wollongong, 2500

About Blogs
Melody Jaimon • December 8, 2022
Create a new blog and add posts using the blog editor. Two editing modes work together to allow you to create the ideal blog for your business and simply update it with new entries that look fantastic, contain the information you desire, and are optimised for SEO. Layout mode and Post mode are the two editing modes.
See the video below to learn more about blogs:
Layout Mode
Layout mode is where you arrange all of your current and future blog content. In this mode, you customise the layout of elements that display in every post, such as the blog title, author, main image, and so on. These elements are linked to the content of individual posts, resulting in a uniform framework for all entries. This is vital for SEO and makes your blog easier to read for visitors.
The content placeholder is the space provided in Layout mode for each post's content. While you can’t change the content here, you can add elements to it. Columns, rows and sections can be added above, below and next to the content placeholder.
Changes made in Layout mode are reflected in all posts. For example, if you put a section beneath the content placeholder in Layout mode, this part appears in every blog post precisely as it appears in Layout mode.
Note:
Layout mode changes every blog post.
Click
Blog, then
Edit Layout to utilise Layout mode.
Republish the site to see Layout Mode changes online.
Post Mode
Write individual blog posts in Post mode. You have total control over the content of each post (which is contained inside the content placeholder area seen in Layout mode) and you can add any widgets you like. Editing a post in the editor is similar to editing a page.
When in Post mode, add whatever elements you like to a specific post. For example, if you’re working on a post with many images, you may use various Image widgets. If a map is required for a certain post, add a Map widget here.
Note:
All modifications made to a single post in Post mode affect only that post.
To utilise Post mode for a specific blog post, select
Blog and then
Manage Posts on the left side. To open the blog in Post mode, click a blog in the list or the
Edit icon.
You must republish the post for the changes made in Post Mode to be visible online.
Connected Elements
Connecting elements are what give your blog its strength and usability. These features guarantee every blog post has a consistent title, author, and image, and these details appear consistently in each post.
When you make a new post, you'll be prompted to input the primary information. This information may be changed later, but including it at the outset keeps your postings structured.
The post title, author, and background images are linked by default. You may delete or update these connections in Layout Mode, but we encourage maintaining them to guarantee your posts have all the information they need for SEO and are readily found by users.
If you disconnect an element, you can link it to another element or reconnect it.
Changing Connected Elements
You may change connected elements in your blog in two ways: by updating the content in Post mode or by changing the connection in Layout mode.
Changing Connections in Post Mode
Modify the content of connected elements in one of the following ways:
- Through the Settings Menu: Click to see the post information and then edit.
- In the popup that appears, click the connected element (for example, post author) and update the text.
See
Manage Post Settings for further details.
Changing Connections in Layout Mode
Layout Mode replaces or removes connected elements. To replace a connecting element, click the Connect Data button. Choose the associated element to utilise, then click Done.
Click
none to disconnect completely. This will delete the link from all blog articles, and the element will no longer exist.
See
Connected Data for further details.
Manage Posts
You may accomplish the following using Manage Posts:
- Make new posts
- The gear tool provides access to post settings
- Look for posts by title and author
- Sort posts by draft or published status
- Posts can be previewed, duplicated, or deleted
- Select the editing tool, click on the post title, or click on the post thumbnail to modify it
- Posts can be published or republished
Posts are easily found because of the limitless scrolling and the search tool available.
Post Settings
In Manage Posts, click the gear icon next to the post name to see the Post Settings. You may navigate between posts by using the arrows at the top of the page.
Post Status, Post Details, and Post Metadata are the three components of Post Settings. See
Manage Post Settings for further information.
Webhooks Integration
When a blog post is published, a notice can be sent using the Webhooks integration. A publish can also be triggered within the Website Builder editor.
Blog Settings
When you create a new blog, a pop-up appears asking you to name it and provide an image, title, and description. All of these details can be changed later in the Blog Settings section. This information is also utilised in RSS feeds. See
Blog Settings for additional details.
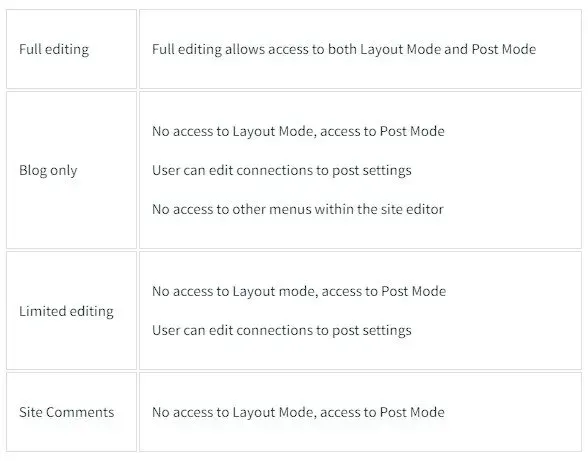
Permissions
Permissions for the blog are the same as they are for other pages.
When users join a site, their names appear in the author list.
Add Blog Widgets
There are three blog widgets available: All Posts, Recent Posts, and Search Posts. These widgets allow your blog to be available from any location on your site.
Any blog widget on your site can be added to any post. You can add the All Posts widget to your homepage and to your blog.
See
Blog Widgets for further details.
Blog Backup
When your site is backed up, your blog content is also backed up. If you restore a backup, the blog in the restored version of the site will be the one you restored. It should be noted that the restored version will not be visible until it's published. As with any site backup, the runtime and editor will appear different. See Backup Sites for more information.
A non-published restored blog post isn't live until the restored site is published (unlike regular posts, which do not require the site to be published again for the post to go live).
When you restore a backup version, a new backup version is produced automatically.
Considerations
- Unpublished or draft posts are not accessible in the Website Builder editor.
- The All Posts widget does not display draft or unpublished posts.


Love My Online Marketing has 10+ Years of working alongside businesses and helping them grow. Discuss your options for online success from website Design and Development through to Google Marketing.
Do you want more traffic and business leads?
Love My Online Marketing is determined to make a business grow. Our only question is, will it be yours?