Crown Street, Wollongong, 2500

Creative Ways to Show Off Your Website Design on Social Media
Melody Jaimon • May 12, 2025
Launching a new website is a big milestone for any business, but the work doesn’t stop once the site goes live. To make the most of your investment, you need to get it in front of as many eyes as possible. And where’s the best place to do that? Social media.
The good news? With a few strategic approaches and clever tools, you can turn your site into a content marketing powerhouse across platforms like Instagram, LinkedIn, TikTok, Facebook, and Pinterest.
This comprehensive guide walks you through practical, engaging, and visually-driven strategies to highlight your website’s best features on social media, while increasing reach, interaction, and ultimately, conversions.
Why Visibility on Social Media Matters After a Website Launch
Social media has become the modern-day discovery engine. People aren’t just Googling services anymore — they’re stumbling across brands in their Instagram feeds, being tagged in Facebook comments, and clicking through carousels on LinkedIn.
If your website is your online home, then social media is the map that gets people there. But you can’t expect people to knock on your digital door if you never show them what’s inside.
Strategically promoting your website on social:
- Builds anticipation around launches
- Highlights real-time updates, blogs, services or features
- Encourages sharing and saves
- Increases organic traffic to your site
- Showcases your professional web design to a wider audience
Step-by-Step: Promoting Your New Website on Social Media
Launching a new website? Don’t just quietly publish it — give it the attention it deserves. Let’s break down the process into manageable phases — from the initial announcement to ongoing post-launch momentum.

1. Plan Your Messaging First
Before you post anything, clarify:
- What’s new about the website?
- What are you trying to get people to do? (e.g. book a service, browse your portfolio, subscribe to your newsletter)
- What emotions do you want to evoke? (e.g. excitement, curiosity, trust)
Having these answers ensures your messaging stays focused and consistent.
2. Gather Visual Assets
Strong visuals are essential. Depending on your website, you might use:
- Screenshots of key pages
- Scrolling preview videos
- Before/after images
- Mobile and desktop mockups
- Team or office photos to humanise the content
Even if you’re not a designer, tools like Canva or pre-made Photoshop templates can help you present your website in a professional format.
3. Schedule Multiple Posts Over 2–3 Weeks
Don’t just post once. Treat your website like a new product — plan a mini-campaign to build momentum. Schedule several posts highlighting different features or benefits, and time them strategically for maximum reach. Not sure when to post? Here are the best times to post on social media to help boost engagement and visibility.
4. Track and Optimise
Keep an eye on how your posts perform. Most platforms offer free insights on reach, engagement, and link clicks. Use these to learn what resonates best with your audience and tweak future posts accordingly.
Social Media Post Ideas for Launching Your New Website
Here are some engaging post formats you can use to shout about your new design, without sounding repetitive.

1. Launch Announcement
Start your campaign with a punch. Announce your website launch with confidence and clarity. Include an eye-catching image (a homepage snapshot or sleek mockup), a short teaser of what’s new, and a direct link to the site.
Tip: Use punchy language like “We’re live!” or “Welcome to our new home on the web!” to create excitement.
2. Behind-the-Scenes
Bring your audience behind the curtain. Share the “why” behind your website revamp. Was it part of a brand refresh? A step towards better usability? A response to customer feedback?
This type of post humanises your brand and gives context to the change, making users feel involved in your growth.
3. Highlight a New Feature
Rather than trying to show off the whole website in one go, break it into digestible features. Highlight a new function or design element in each post—whether it’s a new booking system, live chat, or a sleeker layout. It gives you multiple content pieces, and shows real value in every improvement you’ve made.
4. Before-and-After Transformations
Before-and-after presentations are powerful because they clearly demonstrate the transformation your design has made. Start by showing what the website looked like prior to your redesign—maybe it was outdated, cluttered, or not mobile-friendly. Then, reveal the refreshed version with modern aesthetics and better usability. This direct comparison makes the value of your work obvious and immediately impressive.
How to use it:
- Create a carousel post or short video showing the “before” (the old website) and the “after” (your redesign).
- Add annotations pointing out specific changes like layout restructuring, improved navigation, or updated typography.
Add a bold “drag to reveal” or “swipe for magic” callout to increase engagement.
5. Animated Scrolling Preview
This one is a game-changer — and one of the most visually engaging types of content you can post.
Instead of a flat screenshot, you show your website in motion as it scrolls through its sections, just like a user would experience it.
At Love My Online Marketing, we believe that websites should be experienced, not just viewed. That’s why we use animated scrolling website previews to bring our designs to life on social media. Curious how we create them? Below is a beginner-friendly step-by-step guide to help you craft your own animated scrolling preview.
How to Make a Scrolling Website Animation
Want to turn your website into an eye-catching scroll-through video? Follow these simple steps to create a smooth, elegant preview you can share across Instagram, LinkedIn, Facebook, or even email campaigns.
Step 1: Add Device Mockups in Photoshop
Before you animate your scrolling preview, you might want to place your design inside device frames, like a laptop or mobile phone. This gives your content a polished, on-brand look, especially useful for social posts or client showcases.
Here’s how to create those mockups in Photoshop.
1. Download Mockup Templates
You’ll need PSD (Photoshop) mockups that include smart objects. These allow you to easily insert your own content.
Where to find them:
- Freepik
- Mockup World
- Unblast
- Or search “free laptop PSD mockup” or “mobile phone screen mockup”
Look for mockups with layered PSD files, ideally with front-facing devices for a clean, versatile look. Once you’ve downloaded a device mockup, open the PSD file.
2. Once your mockup (e.g., a laptop image) is in your Photoshop document:
- Select the Rectangle Tool (U) from the left toolbar.
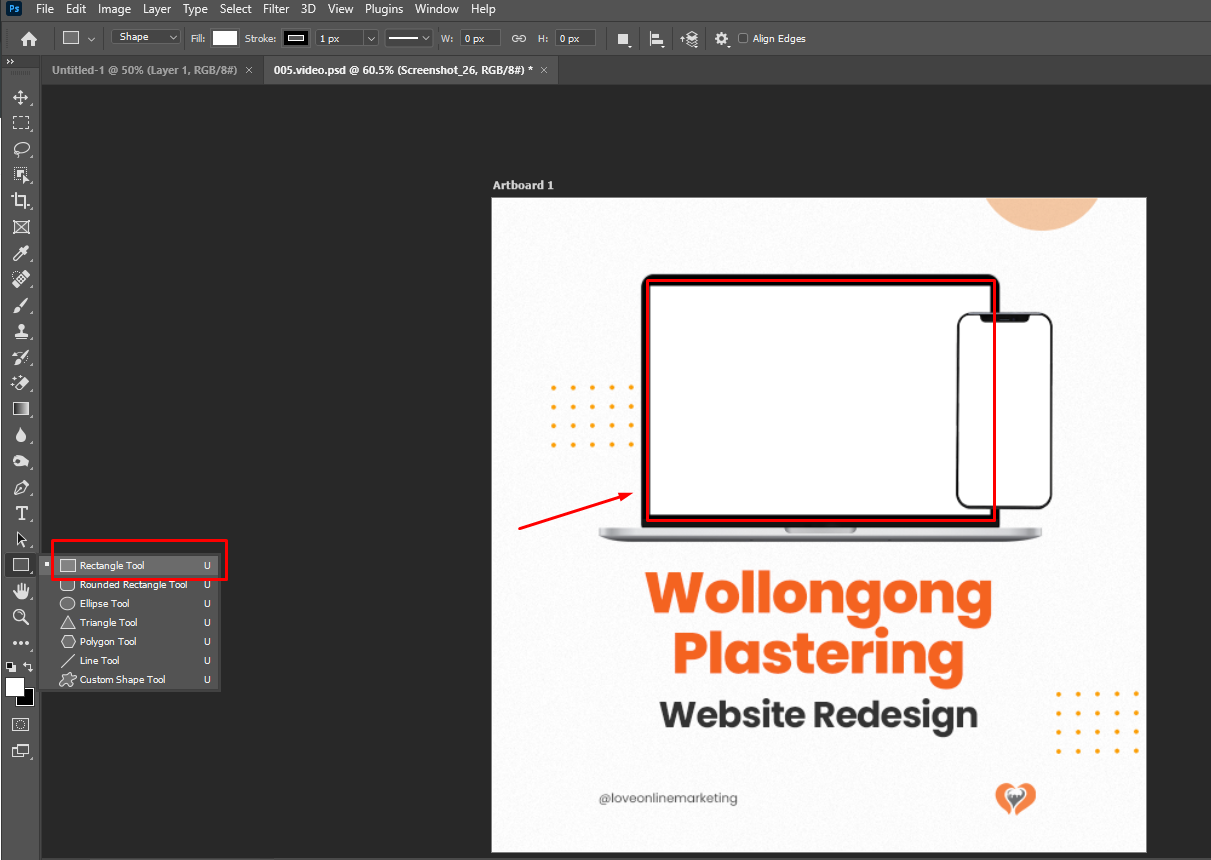
- Draw a rectangle that perfectly covers the screen area of your laptop image. This rectangle acts as your clipping mask frame. It doesn’t have to be the same colour as the screen. Just focus on getting the dimensions right — it's like creating a window to your scrolling screenshot.
Step 2: Use a Screenshot Extension (Free & Fast)
If you want a simple, no-cost way to grab a full-page screenshot in just seconds, a browser-based screenshot extension is your best bet.
1. Install the Extension
Head over to your browser’s extension store (Chrome or Firefox) and search for a
reputable full-page screenshot tool. Follow the prompts to add the extension to your browser toolbar. Once installed, you’ll see the
Screenshot icon (a camera symbol) in your browser's extensions area.
2. Visit the Website You Want to Capture
Load the page completely so all content is visible. This ensures your screenshot includes every section from header to footer.
3. Click the Extension Icon
Click on the
Screenshot icon in your toolbar. Select
“Capture” > “Full Page”. The extension will automatically scroll through the entire page and stitch the sections together.
4. Download or Edit
After the screenshot is captured:
- You’ll be taken to an editing screen.
- Use tools to crop, blur, highlight, or add text to areas of your screenshot.
5. Save or Download
- Click “Done” in the top right corner.
- Choose to either:
- Download the image
- Save to the cloud (requires a free account)
- Copy to clipboard
Step 3: Insert Your Screenshot
Now, drag your long website screenshot (PNG or JPEG) into the file. Place it directly above the rectangle layer in the Layers panel on your mockup design.
- Use Cmd + T (Ctrl + T) to resize the screenshot so that the top of the website aligns perfectly with the top of the rectangle (your screen area).
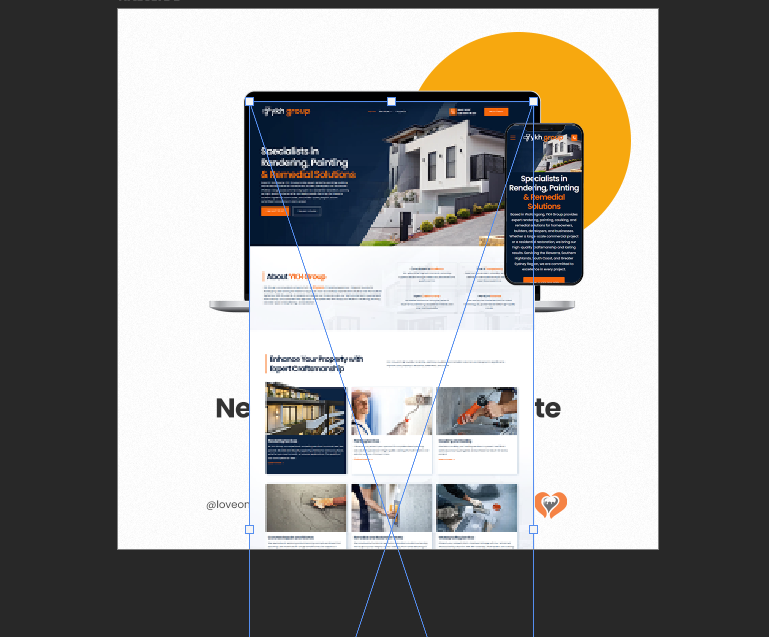
To lock your website screenshot into the screen shape:
- Hover your cursor between the two layers (your screenshot and the rectangle layer).
- Hold Option (Mac) or Alt (Windows).
- When you see a little downward arrow icon, click.
This creates a clipping mask — meaning your screenshot will only appear within the bounds of the rectangle.
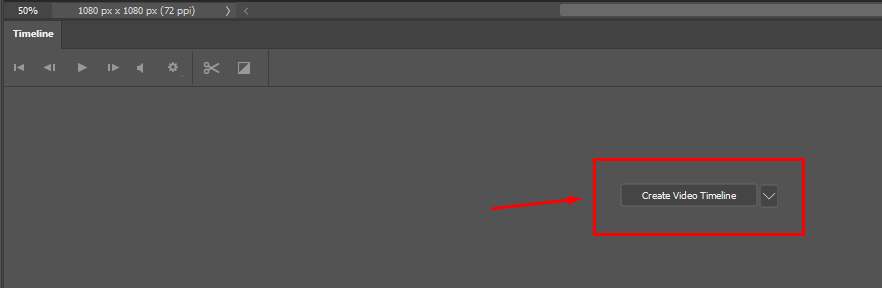
Step 4: Creating Animated Scrolling Previews
Go to Window > Timeline if it’s not already open. In the Timeline panel, click Create Video Timeline. You’ll see your layers appear as horizontal strips on a video track — this is where you animate.
Here’s the fun part:
1. In the Timeline, click the dropdown arrow next to your screenshot layer.
2. Tick the
“Transform” checkbox — this will let you create motion.
At
0 seconds, make sure the screenshot shows the
top of the website inside the mockup.
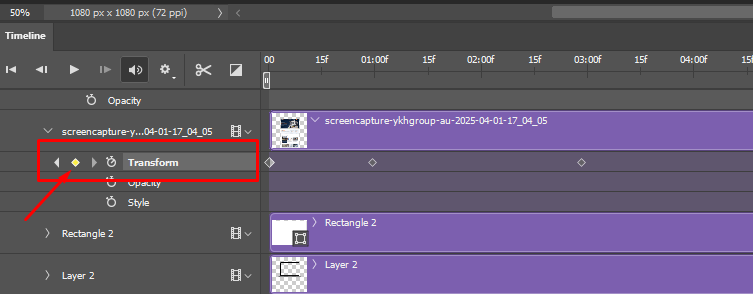
3. Move the playhead to, say, the 10-second mark.
4. Use the Move Tool (V) to drag the screenshot upward, revealing the lower portion of the website inside the screen.
Photoshop will automatically generate a second Transform keyframe, and animate the image smoothly between the top and bottom over the time span.
Step 5: Add Final Touches
Before exporting:
- Add shadows, logo, or background graphics. You can also add text overlays or fade-in animations for extra polish.
If you have a mobile version too, you can repeat the exact steps using a mobile device mockup side-by-side.
Step 6: Preview & Export
Hit the spacebar to preview the scroll.
If everything flows smoothly:
- Go to Render Video
- Select
H.264 format (for MP4 video)
- Choose your frame rate and quality (25–30 fps is great)
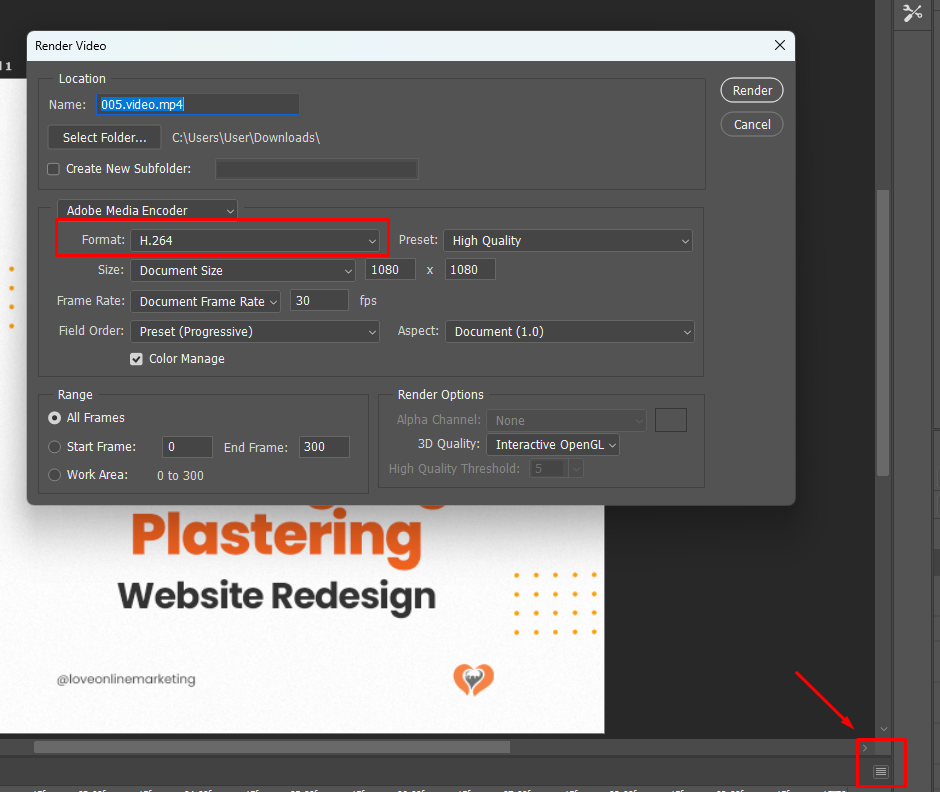
Export, and you're done!
This method is perfect when you want to present your work as if it’s alive — not just a picture on a screen. Not only do you show off the design, but you also demonstrate the flow and UX, which speaks volumes to both users and potential clients.
Maximise Your Website Launch with Lasting Impact
Publishing a new website is a powerful move — one that represents growth, evolution, and a fresh direction for your brand. But the real value isn’t found in the launch alone. It lies in how you amplify that moment, how you share it with your audience, and how you turn attention into action.
A polished website shouldn’t sit quietly in the background. It deserves visibility. It deserves conversation. And most of all, it deserves to be discovered by the people who matter most to your business. That’s where strategic promotion steps in. Sharing your launch across social media channels opens the door to real engagement, letting your followers know what’s changed, why it matters, and how it benefits them.
At Love My Online Marketing, we create more than websites — we build experiences that drive growth. From the first planning session to post-launch promotion, our team collaborates with you to craft a digital presence that feels modern, intuitive, and built to deliver real-world results. Call us on 0480 012 463 or visit our website to start your next chapter with confidence.


Love My Online Marketing has 10+ Years of working alongside businesses and helping them grow. Discuss your options for online success from website Design and Development through to Google Marketing.
Do you want more traffic and business leads?
Love My Online Marketing is determined to make a business grow. Our only question is, will it be yours?