Crown Street, Wollongong, 2500

eCommerce: Getting Started
Melody Jaimon • September 25, 2025
Getting an online shop up and running can feel a bit full on. No dramas. We will show where to click, what to set, and how to sell. Use the quick menu to jump straight to the bit you need and follow the steps. Too easy.
Whether you are brand new to eCommerce or moving an existing store, this guide gives you a clear starting point. Each section covers the practical stuff like products, payments, shipping, and reports so you are never left guessing. Stick with the steps and you will have your store ready to trade sooner than you think.
Quick menu
Store Overview and Set Up
This section is the first stop. We connect the shop, pick the basics, and understand where things live.
How to use it step by step
- Log in to your Website Builder, open the Help Centre , then select Third Party eCommerce.
- Open Store Overview and Set Up.
- Follow the setup guides to connect the store app and fill in basic shop details.
What lives where
- Storefront design is what shoppers see on your pages.
- Store control panel is where we manage products, orders, payments and shipping.
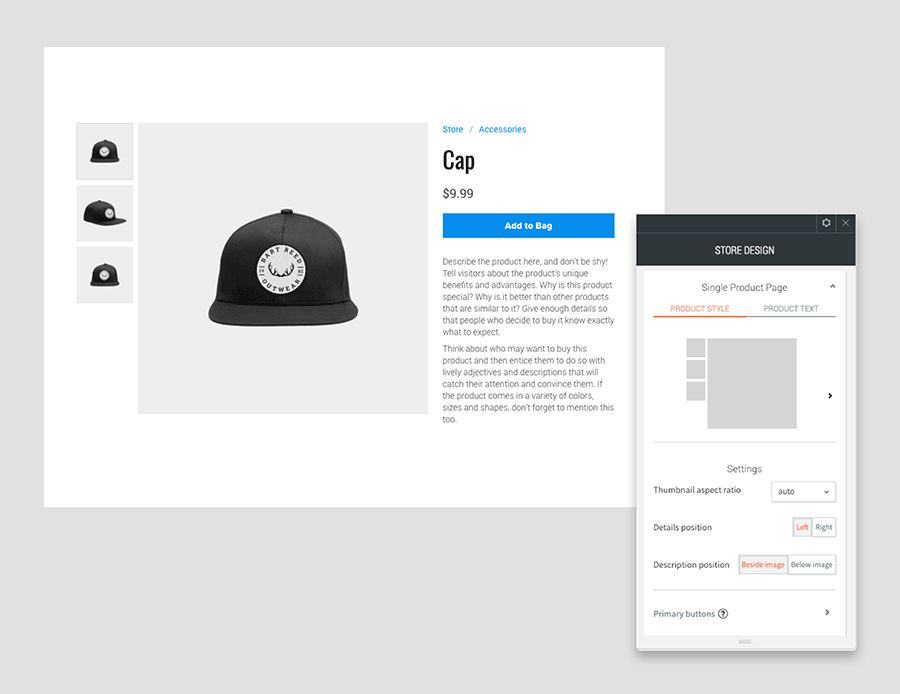
Edit the storefront with widgets
Drop these on your page to show the shop. Each has settings you can tweak.
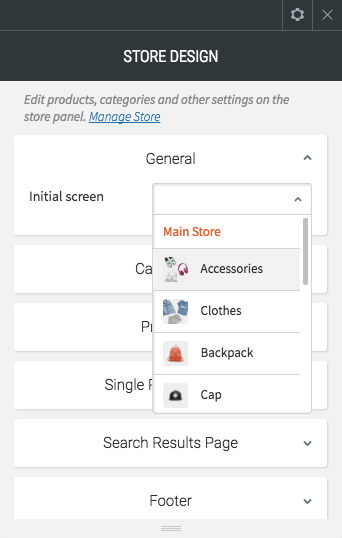
Main Store
Product Gallery
Product Search
Categories
Cart
- Open the page editor.
- Open Widgets and drag the widget you need onto the page.
- Click the widget and use Edit Content to choose what it shows.
- Use Edit Design to match your colours, spacing and layout.
- Preview then publish.
Plans and adding a store
- Standard — basic store features.
- Advanced — more features like extra payment and shipping options.
- Unlimited — full suite for bigger stores.
- From your dashboard, choose a plan that fits your needs.
- Add the store app to your site when prompted.
Location settings
- Open the store control panel.
- Set country , currency , and weight unit so shipping and tax work properly.
Add and Manage Products or Services
Here we load in products or services and keep them tidy.
Add products one by one
- Open the store control panel and go to Products.
- Click Add Product. Enter title, price, description.
- Upload images and set categories.
- Use options or variants if you have sizes or colours.
- Save.
Import many with CSV
- Download the sample CSV from the control panel.
- Fill in your product rows. Keep headings the same.
- Upload the CSV to import in bulk.
Organise and maintain
- Use Categories so shoppers can browse easily.
- Track stock with Inventory.
- Update or archive products as needed.
Payments and Orders
Time to get paid and manage orders without headaches.
Connect payment methods
- In the control panel, open Payments.
- Connect gateways like PayPal , Stripe or Square.
- Set any manual payments you accept, like bank transfer.
- Test a small order to confirm checkout works.
Taxes and invoices
- Open Taxes and choose auto or manual rates for your region.
- Turn on invoice emails if required and add your business details.
Manage orders and refunds
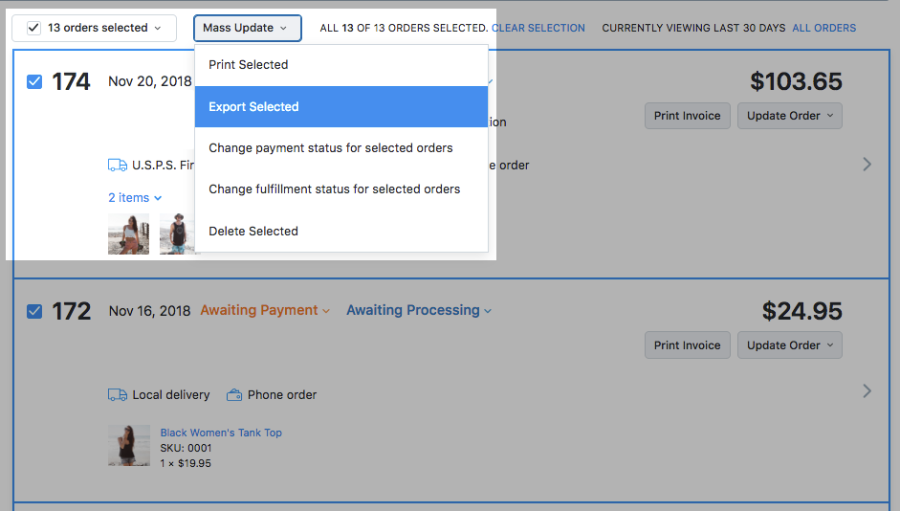
- Check new orders under Orders.
- Change order status as you pack and send.
- Process refunds when needed.
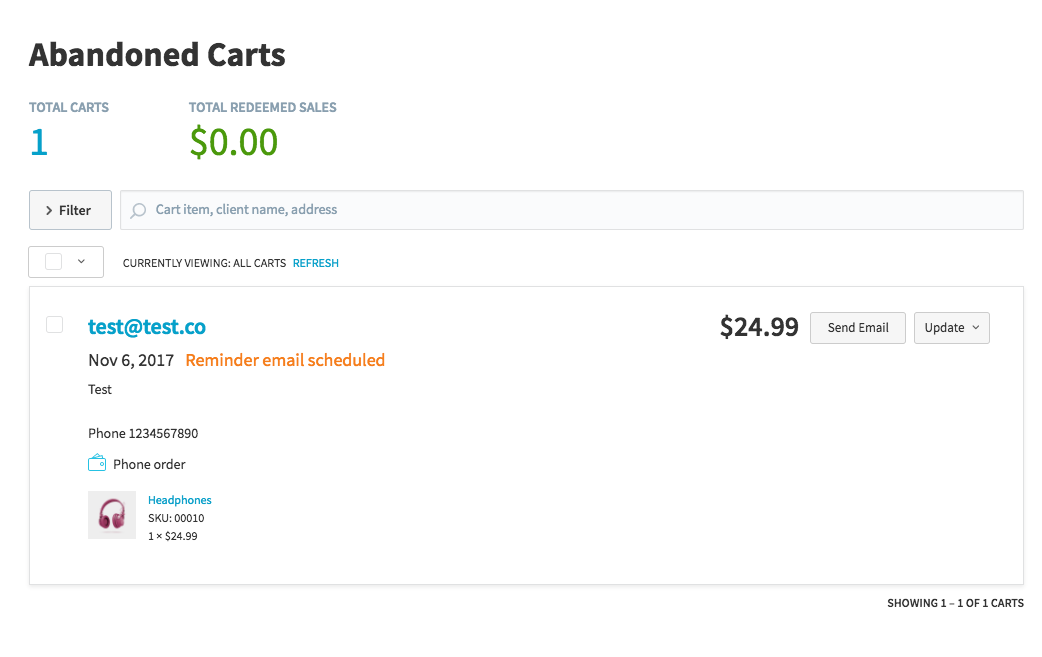
- Use Abandoned Carts to email shoppers who did not finish checkout.
Shipping and Delivery
Sort postage, couriers, and pickups so orders arrive on time.
Set methods and rates
- Open Shipping in the control panel.
- Create zones for where you ship.
- Add methods such as flat rate, real time carrier, free shipping over a set amount, or Local Pickup.
- Set handling time and delivery estimates.
Pack and track
- Choose packaging sizes if your carrier needs them.
- Add tracking numbers to orders so customers get updates.
Sales Channels and Reports
Sell in more places and keep an eye on your numbers.
Connect sales channels
- Open Sales Channels.
- Connect Facebook and Instagram to sync products.
- Set up Google Shopping if you want listings in Google.
- Link to Square POS if you also sell in person.
Read your reports
- Open Reports to see sales, popular products and repeat customers.
- Use the insights to adjust pricing, promos and stock.
Manage Customers
Keep your buyers happy and coming back.
Customer records and groups
- Open Customers to view profiles and order history.
- Create groups for VIPs or wholesale if needed.
- Make sure marketing opt in is set before you send promos.
Support and follow up
- Send order updates and delivery info promptly.
- Use simple coupons for win backs when it makes sense.
Takeaway
That is the lot. Start with store setup, add products, turn on payments, sort shipping, then plug in sales channels. Keep an eye on orders, reports and customer care. Do it step by step and you will be selling in no time.
Remember, eCommerce is not about getting everything perfect straight away. It is about building, testing, and improving as you go. Even small changes like clearer product photos or simpler checkout options can make a big difference to sales. Keep it steady, stay consistent, and your shop will grow over time.
If you need more info, access it here: Third Party eCommerce Help Centre.


Love My Online Marketing has 10+ Years of working alongside businesses and helping them grow. Discuss your options for online success from website Design and Development through to Google Marketing.
Do you want more traffic and business leads?
Love My Online Marketing is determined to make a business grow. Our only question is, will it be yours?